


EX2500 Ethernet Switch Configuration Guide
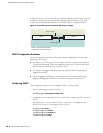
46 Port Trunking Configuration Example
1. Follow these steps on the EX2500 switch:
a. Define a trunk group.
ex2500(config)# portchannel 3 member 2,9, 16
ex2500(config)# portchannel 3 enable
b. Verify the configuration.
ex2500(config)# show portchannel 3
Examine the resulting information. If any settings are incorrect, make
appropriate changes.
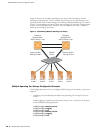
2. Repeat the process on the other switch.
ex2500(config)# portchannel 1 member 1,11,18
ex2500(config)# portchannel 1 enable
ex2500(config)# show portchannel 1
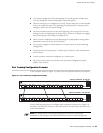
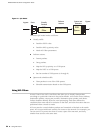
3. Connect the switch ports that will be members in the trunk group.
Trunk group 3 (on the EX2500 switch) is now connected to trunk group 1 (on
the other switch).
4. Examine the trunking information on each switch.
ex2500# show portchannel information
PortChannel 3: Enabled
port state:
2: STG 1 forwarding
9: STG 1 forwarding
16: STG 1 forwarding
Information about each port in each configured trunk group is displayed. Make
sure that trunk groups consist of the expected ports and that each port is in the
expected state. The following restrictions apply:
Any physical switch port can belong to only one trunk group.
Up to 12 ports can belong to the same trunk group.
All ports in static trunks must be have the same link configuration (speed,
duplex, flow control).
Trunking from third-party devices must comply with EtherChannel
technology.
NOTE: In this example, two EX2500 switches are used. If a third-party device
supporting link aggregation is used (such as routers and switches with
EtherChannel technology or Sun's Quad Fast Ethernet Adapter), trunk groups on
the third-party device should be configured manually. Connection problems could
arise during automatic trunk group negotiation on the third-party device.