


4
CONTROLS AND FEATURES
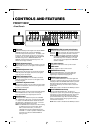
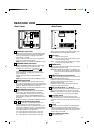
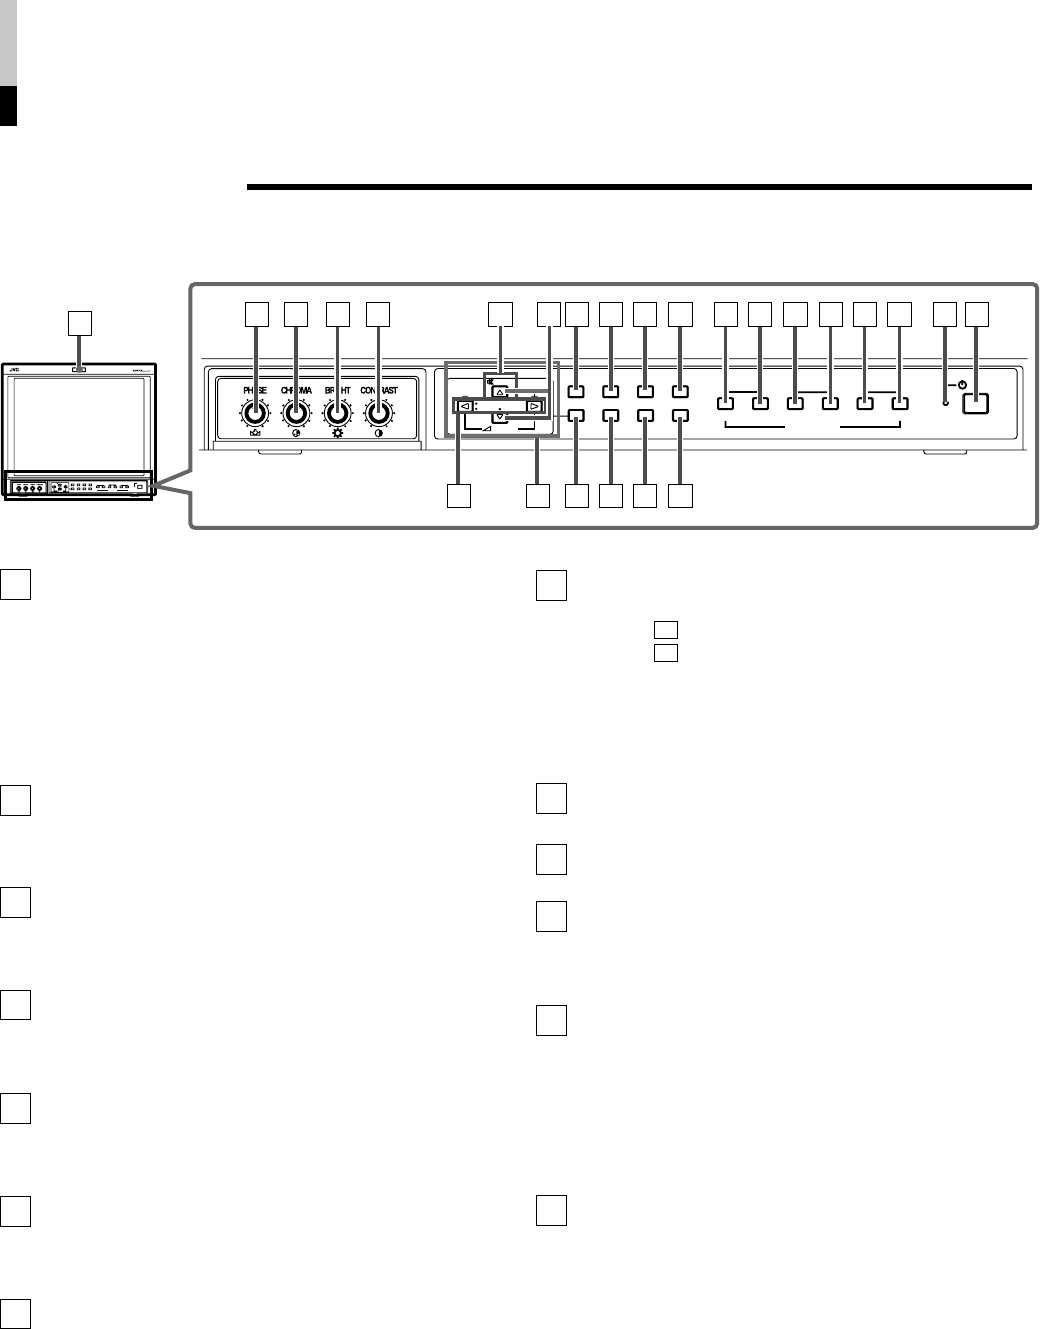
FRONT VIEW
<Front Panel>
Tally lamp
Lights when the tally control signal is ON. Set the MAKE/
TRIGGER terminal’s tally control in the REMOTE
(external control) terminal setup menu. For details, refer
to Page 20. The lamp color can be set to red or green.
To set the color, use TALLY SELECT in the "FUNCTION
SETTING" setup menu or MAKE/TRIGGER in the
REMOTE (external control) terminal setup menu. For
details, refer to Page 16 and 20.
PHASE adjustment knob
Adjusts picture hue. Turn the knob to the left to make the
picture redder, and turn it to the right to make the picture
greener.
CHROMA adjustment knob
Adjusts picture color density. Turn the knob to the left to
make the picture color lighter, and turn it to the right to
make the picture color deeper.
BRIGHT adjustment knob
Adjusts picture brightness. Turn the knob to the left to
make the picture darker, and turn it to the right to make
the picture brighter.
CONTRAST adjustment knob
Adjusts picture contrast. Turn the knob to the left to make
the picture contrast lower, and turn it to the right to make
the picture contrast higher.
VOLUME buttons
Adjusts the speaker volume. Pressing this button displays
the VOLUME level bar on the screen. Pressing the
button again allows you to adjust speaker volume.
MUTING button
Pressing this button mutes the input sound. "MUTING
ON" is displayed on the screen. Pressing the VOLUME
"–/+" button or the MUTING button restores the sound.
"MUTING OFF" is displayed on the screen. On-screen
indications disappear after three seconds.
NOTE: The MUTING button functions even when nothing
is displayed on screen (such as Main, Setup
Menu, or Volume level bar ). In this case,
"MUTING OFF" will not be displayed when the
VOLUME "–/+" button is pressed. Indications will
be shown even when the STATUS DISPLAY
setting is "OFF."
1
10
2
3
4
5
6
9
11
EMBEDDED AUDIO channel switch button
Pressing this button switches the input sound channel.
When the button is pressed, the channel is advanced.
When the button is pressed, channel is reversed.
NOTE: The channel indication will display the selected
channel when EMBEDDED in the "FUNCTION
SETTING" setup menu is selected. It is valid
when an input card compliant with EMBEDDED
AUDIO is installed.
Menu select buttons
Selects menu screen items or set-up menu screen.
MENU button
Displays, adjusts or closes a menu screen.
DEGAUSS button/lamp
Press the DEGAUSS button. The button lights and
degaussing is performed automatically. When the
degaussing is completed, the light goes off.
UNDER SCAN button/lamp
Press the UNDER SCAN button. The button lights and
the screen is reduced (under-scan) and the whole screen
is displayed. When the UNDER SCAN button is pressed
while lit, the light goes off and the screen returns to
normal size (over-scan). Use this function to check the
whole screen.
NOTE: This function is invalid with the RGB-input screen.
PULSE CROSS button/lamp
Press the PULSE CROSS button. The picture is
separated into 4 parts. The synchronized signal displayed
in the shape of a cross separating the parts. The screen
automatically brightens to make it easier to confirm
synchronized sections easy. When the PULSE CROSS
button is pressed while lit, the light goes off and the
normal screen is restored.
NOTE: This function is invalid with the RGB-input screen.
12
13
VOLUME
SLOT 1
A
B
DEGAUSS
MENU
SCREENS
CHECK
ASPECT
AREA
MARKER
UNDER
SCAN
PULSE
CROSS
COLOR
OFF
SLOT 2
C
D
SLOT 3
POWER
E
F
INPUT SELECT
2 3 4 5 87 11 12 13 14
1096 15 16 17
18 19 20 21 22 23 24 25
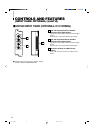
VOLUME
SLOT 1
A
B
DEGAUSS
MENU
MUTING
SCREENS
CHECK
ASPECT
AREA
MARKER
UNDER
SCAN
PULSE
CROSS
COLOR
OFF
SLOT 2
C
D
SLOT 3
POWER
E
F
INPUT SELECT
1
MUTING
8
7
!
!
LCT1117-001A 02.1.29, 2:31 PM4