


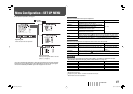


1
3
4
5
6
7
2
8
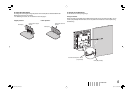
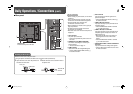
7 Rear panel
Security slot
Install a security wire to this slot.
4 DVI-D terminal
Input terminal for the DVI-D signal from a
personal computer.
• Use the AUDIO INPUT DVI-D terminal (
7)
for audio connection.
5 VIDEO 2 IN/OUT terminals
Input (IN) and output (OUT) terminals for the
composite signals.
• Use the AUDIO INPUT VIDEO 2 terminal
(
7) for audio connection.
6 VIDEO 1 IN/OUT, Y/C terminals
Input (IN) and output (OUT) terminals for the
composite signals and input terminal for S-
video signals (Y/C).
• When both the IN and Y/C terminals are
used, signals to the Y/C terminal have
priority.
• Use the AUDIO INPUT VIDEO 1 terminal
(
7) for audio connection.
7 AUDIO INPUT VIDEO 1/VIDEO 2/RGB/DVI-D
terminals
Input terminals for the analog audio signals.
• Use the video terminal with the same name
for video connection.
Note for connections
• Before making any connections, turn off all the
equipment.
• Use a cord whose plugs correctly match the
terminals on this monitor and the equipment.
• Plugs should be firmly inserted; poor
connections could cause noise.
• When unplugging a cord, be sure to grasp its
plug and pull it out.
• DO NOT connect the power cord until all
connections are completed.
• Refer also to the user manual of each piece of
equipment.
1 AC IN terminal
AC power input connector.
• Connect the provided AC power cord to an
AC outlet.
2 REMOTE terminal (MAKE/TRIGGER)
Ter minal for controlling the monitor by an
external control.
☞ “External Control” on page 13
3 RGB terminals
Input terminal for the analog RGB signals.
• Use the AUDIO INPUT RGB terminal (
7)
for audio connection.
Daily Operations / Connections (cont.)
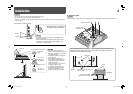
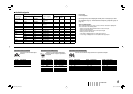
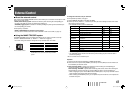
Attach the ferrite core to the power cord.
• Using the power cord without the ferrite core may lead to noise (interference).
Attaching the Ferrite Core
Ferrite core
P
ower cord
2 Attach the ferrite core to the AC IN end of
the power cord.
To the AC IN
terminal
1 Open the ferrite core, insert the power cord
and close the ferrite core.
LMH191EA_EN.indd 8LMH191EA_EN.indd 8 08.4.18 0:45:48 PM08.4.18 0:45:48 PM