


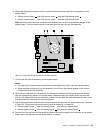
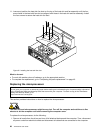

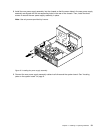
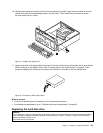

Figure 23. Removing the heat sink fan duct
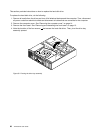
5. Disconnect the power supply assembly cables from all drives and from the 24-pin power connector and
4-pin power connector on the system board. See “Locating parts on the system board” on page 9
.
Note: You might also need to release the power supply assembly cables from some cable clips or ties
that secure the cables to the chassis. Make sure that you note the cable routing before disconnecting
the cables.
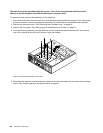
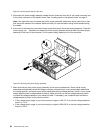
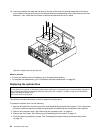
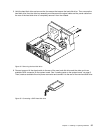
6. At the rear of the computer, remove the three screws that secure the power supply assembly. Press the
power supply clip 1 downward to release the power supply assembly and then slide the power supply
assembly to the front of the computer. Lift the power supply assembly out of the computer.
Figure 24. Removing the power supply assembly
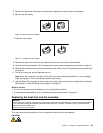
7. Make sure that the new power supply assembly is the correct replacement. Some power supply
assemblies automatically sense the voltage or accept universal input, some power supply assemblies
are voltage specic, and some power supply assemblies have a voltage-selection switch. If your power
supply assembly has a voltage-selection switch, make sure that you set the voltage-selection switch
to match the voltage available at your electrical outlet. If necessary, use a ballpoint pen to slide the
voltage-selection switch to the correct position.
• If the voltage supply range in your local country or region is 100–127 V ac, set the voltage-selection
switch to 115 V.
• If the voltage supply range in your local country or region is 200–240 V ac, set the voltage-selection
switch to 230 V.
30 ThinkCentre User Guide