


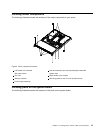
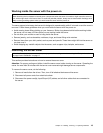
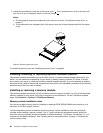
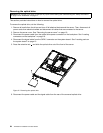


4. Loosen the thumbscrew in the rear of the server cover 1 . Then, slide the server cover to the rear until
you can lift it up to completely remove it from the chassis 2 .
Notes:
a. The thumbscrew is securely installed and you need to use a tool, for example a screw driver, to
loosen it.
b. The thumbscrew is an integrated part of the server cover and it cannot be removed from the server
cover.
Figure 8. Removing the server cover
To reinstall the server cover, see “Installing the server cover” on page 64.
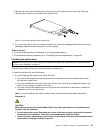
Installing, removing, or replacing optional hardware devices
This section provides instructions on how to install, remove, or replace optional hardware devices for your
server. You can expand the capabilities of your server by adding memory modules, PCI cards, or drives,
and maintain your server by replacing the failing optional hardware devices. If you are replacing an optional
hardware device, perform the removal procedure and then perform the installation procedure for the optional
hardware device that you want to replace.
Installing or removing a memory module
This section provides instructions on how to install or remove a memory module. For a list of the supported
memory modules for your server, go to http://www.lenovo.com/thinkserver. On the ThinkServer systems
page, click Products ➙ Options ➙ ThinkServer Memory.
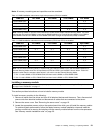
Memory module installation rules
Your server has eight memory slots for installing or replacing DDR3 SDRAM DIMMs that provide up to a
maximum of 64 GB of system memory.
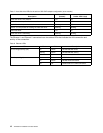
The following tables provide information about the memory module installation rules that you should
consider when installing a memory module. The “X” mark indicates the suggested memory slot(s) into
which the memory module(s) should be installed in different situations. The number, for example 1, 2, or 3,
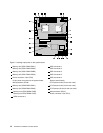
indicates the installation sequence. See “Locating parts on the system board” on page 13
to identify the
various memory slots.
20 ThinkServer Installation and User Guide