


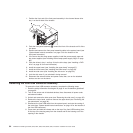

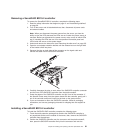
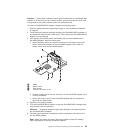

Removing the front adapter-retention bracket
To remove the front adapter-retention bracket, complete the following steps:
1. Read the safety information that begins on page vii and “Installation guidelines”
on page 29.
2. Turn off the server and all attached devices; then, disconnect all power cords
and external cables.
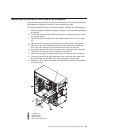
3. Unlock and remove the side cover (see “Removing the side cover” on page 32).
4. Open the front and rear adapter-retention brackets.
5. Remove all adapters (if necessary) and place them on a static-protective
surface.
Note: You might find it helpful to note where each adapter is installed before
you remove the adapters.
6. Grasp one side of the bracket at a hinge point and pull outward (while you
rotate the bracket slightly toward the rear of the server) until the hinge pin on
the bracket is free of the hole; then, grasp the bracket on the other side at the
hinge point, pull outward until the bracket is free of the hinge pin, and remove
the rear adapter-retention bracket from the server.
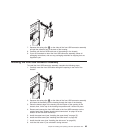
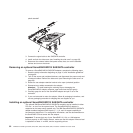
Installing the front adapter-retention bracket
To install the front adapter-retention bracket, complete the following steps:
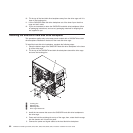
1. Insert one of the hinge pins on the front adapter-retention bracket into the metal
hinge point on the fan cage assembly.
2. Rotate the other hinge pin on the front adapter-retention bracket into position
and push the hinge pin into the other metal hinge point. The hinge pin will
protrude through the hole in the metal hinge point when the adapter-retention
bracket is seated correctly.
3. Reinstall any adapters that you removed earlier.
4. Close the front and rear adapter retention brackets.
5. Install the side cover (see “Installing the side cover” on page 33).
6. Lock the side cover.
7. Reconnect the external cables and power cords; then, turn on the attached
devices and turn on the server.
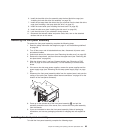
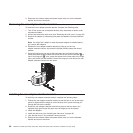
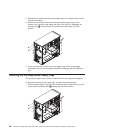
Removing the hot-swap power supply cage
This procedure applies only to server models that have hot-swap power-supplies.
To remove the power-supply cage, complete the following steps:
1. Read the safety information that begins on page vii and “Installation guidelines”
on page 29.
2. Turn off the server and all attached devices; then, disconnect all power cords
and external cables.
3. Unlock and remove the side cover (see “Removing the side cover” on page 32).
4. Remove the hot-swap power supplies (see “Removing a non-hot-swap power
supply” on page 96).
Note: It might be helpful to lay the server on its side for the remainder of this
procedure.
Chapter 6. Installing and replacing customer replaceable units 87