


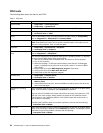


FRU tests
The following table shows the test for each FRU.
Table 1. FRU tests
FRU Applicable test
System board 1. Diagnostics ➙ CPU/Coprocessor
2. Diagnostics ➙ Systemboard
Power
Diagnostics ➙ ThinkPad Devices ➙ AC Adapter ➙ Battery 1 (Battery2)
LCD unit
1. Diagnostics ➙ Video Adapter
2. Interactive Tests ➙ Video
Audio
Enter the BIOS Setup Utility and change Serial ATA (SATA) setting to Compatibility,
and run Diagnostics ➙ Other Device ➙ Conexant Audio
Speaker Interactive Tests ➙ Internal Speaker
Note: Once Audio test is done, the no sound is heard this test. In this case, turn off
and turn on the computer. Then, run this test again.
Keyboard
1. Diagnostics ➙ Systemboard ➙ Keyboard
2. Interactive Tests ➙ Keyboard
Enter the BIOS Setup Utility and change Serial ATA (SATA) setting to Compatibility,
and run Diagnostics ➙ Fixed Disks.
Hard disk drive or solid state
drive
You can also diagnose the drive without starting up the operating system. To diagnose
the drive from the BIOS Setup Utility, do as follows:
1. Remove any diskette from the diskette drive, and then turn off the computer.
2. Turn on the computer.
3. While the message, “To interrupt normal startup, press the blue ThinkVangate
button,” is displayed at the lower left of the screen, press F1 to enter the BIOS
Setup Utility.
4. Using cursor keys, select HDD diagnostic program. Press enter.
5. Using cursor keys, select Main hard disk drive.
6. Press Enter to start the diagnostic program.
Diskette drive 1. Diagnostics ➙ Diskette Drives
2. Interactive Tests ➙ Diskette
Memory
1. If two DIMMs are installed, remove one of them and run Diagnostics ➙ Advanced
Memory Tests.
2. If the problem does not recur, return the DIMM to its place, remove the other one,
and run the test again.
TrackPoint or pointing
device
If the TrackPoint does not work, check the conguration as specied in the BIOS Setup
Utility. If the TrackPoint is disabled, select Automatic to enable it.
After you use the TrackPoint, the pointer may drift on the screen for a short time. This
drift can occur when a slight, steady pressure is applied to the TrackPoint pointer.
This symptom is not a hardware problem. If the pointer stops after a short time, no
service action is necessary.
If enabling the TrackPoint does not correct the problem, continue with the following:
• Interactive Tests ➙ Mouse
Touch Pad
If the Touch Pad does not work, check the conguration as specied in the BIOS Setup
Utility. If the Touch Pad is disabled, select Automatic to enable it. If enabling the Touch
Pad does not correct the problem, continue with the following:
• Interactive Tests ➙ Mouse
32 ThinkPad Edge 11” and E10 Hardware Maintenance Manual