


5 Under Collections, select Bonjour or Rendezvous, and then double-click the printer name.
Note: The application is referred to as Rendezvous in Mac OS X version 10.3, but is now called Bonjour by Apple
Computer.
6 From the main page of the Embedded Web Server, navigate to the page where the wireless settings information is
stored.
Configure the printer for wireless access
1 Type the name of your network (SSID) in the appropriate field.
2 Select Infrastructure as your Network Mode if you are using a wireless router.
3 Select the type of security you use to protect your wireless network.
4 Enter the security information necessary for the printer to join your wireless network.
5 Click Submit.
6 Open the AirPort application on your computer:
In Mac OS X version 10.5 or later
a
From the Apple menu, choose System Preferences.
b Click Network.
c Click AirPort.
In Mac OS X version 10.4 and earlier
a
From the Finder desktop, choose Go > Applications.
b From the Applications folder, double-click Internet Connect.
c From the toolbar, click AirPort.
7 From the Network pop-up menu, select your wireless network.
Configure your computer to use the printer wirelessly
To print to a network printer, each Macintosh user must install a custom PostScript Printer Description (PPD) file and
create a printer in the Printer Setup Utility or Print Center.
1 Install a PPD file on the computer:
a Insert the Software and Documentation CD in the CD or DVD drive.
b Double-click the installer package for the printer.
c From the Welcome screen, click Continue.
d Click Continue again after viewing the Readme file.
e Click Continue after viewing the license agreement, and then click Agree to accept the terms of the agreement.
f Select a Destination, and then click Continue.
g From the Easy Install screen, click Install.
h Type the user password, and then click OK.
All necessary software is installed on the computer.
i Click Close when installation is complete.
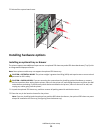
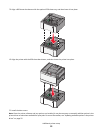
Additional printer setup
29