


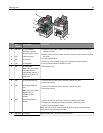

K
M
C
Y
1
7
8
6
4
2
3
5
9
Jam
number
Jam location Instructions
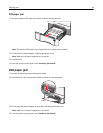
1 200, 241 In the standard
250‑sheet tray and
manual feeder (Tray 1)
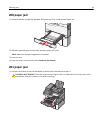
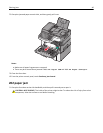
1 Open the front door. Inspect the area behind the front door, and then
remove any jams.
2 Open the fuser cover. Inspect the area under the cover, and then remove
any jams.
3 Close the front door.
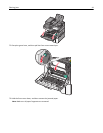
4 Pull Tray 1 out. Inspect the tray area, and then remove any jams.
5 Verify that the paper is loaded correctly.
6 Reinsert Tray 1.
2 201 Under the fuser
3 202 In the fuser
4 230 In the duplex
5 235 In the duplex
Note: This jam number
indicates that the
paper being used for a
duplex print job is not
supported.
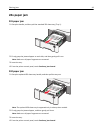
6 242 In the 650‑sheet tray
1 Pull the 650-sheet tray out, and then remove any jams.
2 Reinsert the tray.
7 243 In the 550‑sheet duo
tray
Note: This jam number
appears only in
C546dtn printer
models.
1 Pull the 550-sheet tray out, and then remove any jams.
2 Reinsert the tray.
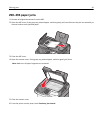
8 250 In the multipurpose
feeder
1 Press the latch to the left to release the multipurpose feeder.
2 Inspect the multipurpose feeder, and then remove any jams.
3 Close the multipurpose feeder.
Note: You may need to open the 650‑sheet duo tray to remove jammed
pages behind the multipurpose feeder.
9 290–294 In the ADF Open the ADF cover, and then remove the jam.
Clearing jams 38