


Scanning to a flash drive
1 Load an original document faceup, short edge first into the ADF or
facedown on the scanner glass.
Note: Do not load postcards, photos, small items,
transparencies, photo paper, or thin media (such as magazine
clippings) into the ADF. Place these items on the scanner glass.
2 If you are loading a document into the ADF, then adjust the paper
guides.
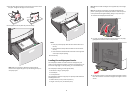
3 Insert the flash drive into the USB port on the front of the printer.
The USB Drive home screen appears.
4 Select the destination folder, and then touch Scan to USB drive.
5 Adjust the scan settings.
6 Touch Scan It.
Clearing jams
Avoiding jams
Paper tray recommendations
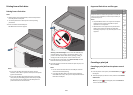
• Make sure the paper lies flat in the tray.
• Do not remove a tray while the printer is printing.
• Do not load a tray while the printer is printing. Load it prior to
printing, or wait for a prompt to load it.
• Do not load too much paper. Make sure the stack height does not
exceed the indicated maximum height.
• Make sure the guides in the tray or the multipurpose feeder are
properly positioned and are not pressing too tightly against the
paper or envelopes.
• Push the tray in firmly after loading paper.
Paper recommendations
• Use only recommended paper or specialty media.
• Do not load wrinkled, creased, damp, bent, or curled paper.
• Flex and straighten paper before loading it.
• Do not use paper that has been cut or trimmed by hand.
• Do not mix paper sizes, weights, or types in the same stack.
• Make sure all sizes and types are set correctly in the printer control
panel menus.
• Store paper per manufacturer recommendations.
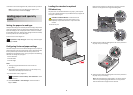
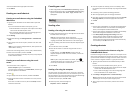
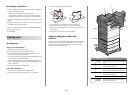
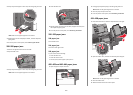
Understanding jam numbers and
locations
When a jam occurs, a message indicating the jam location appears on
the display. Open doors and covers and remove trays to access jam
locations. To resolve any paper jam message, you must clear all
jammed paper from the paper path.
1
2
4
6
5
3
7
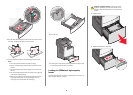
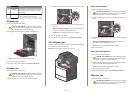
Area Jam numbers What to do
1 200–239 Open side door, and then remove the jammed
paper.
224xOpen side door of the specified tray, and then
remove the jammed paper.
3250Remove all paper from the multipurpose
feeder, and then remove the jammed paper.
4 280–289 Remove all paper from the ADF, and then
remove the jammed paper.
290–292 Close the ADF cover.
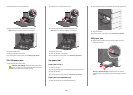
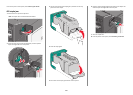
5 400–403
460–461
Open the paper transport unit door, and then
remove the jammed paper.
14