


7
5. Gently lay unit on its right side and remove the six rubber feet with the screw
driver. Remove and retain screws from the two front feet.
NOTE: The rubber feet are not used for rack-mount installations.
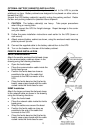
6. Locate securing flanges in the top of packing material and fasten to the UPS
using the flange screws from steps 4 and 5.
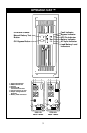
7. Remove display template to change the orientation of the display. You may
also rotate the “Liebert UPStation GXT™” plate located at left of display
area.
8. NOTE: UPS unit MUST be supported by a shelf, brackets or slide rails on
each side. The securing flanges WILL NOT support the weight of the UPS.
9. For slide rail installations, securing hardware is provided with the UPS and is
located in the packing material (slide rails sold separately). Fasten the
slides into position with the screws per the instructions included with the
slide rails.
10. The UPS is now ready to be placed into the equipment rack.
11. Ensure the load equipment is turned off, plug all loads into the UPS output
receptacles.
12. Plug the UPS into a dedicated wall receptacle properly protected by a circuit
breaker or fuse in accordance with the National And Local Codes. Use a 15
amp rated device for the 1800 VA units, and a 20 amp device for the 2700
VA unit. The wall receptacle must be grounded.
13. Locate UPS indoors in a controlled environment, where it cannot be
accidentally turned off. Locate it in an area of unrestricted air flow around
the unit, away from water, flammable liquids, gases, corrosives, or
conductive contaminants. Maintain a minimum of 4 inches (100 mm)
clearance in front and rear of the UPS. Maintain an ambient temperature
range of 32° to 104° F (0° to 40° C).
NOTE: UPS operation in temperatures above 77° F (25° C) reduces battery
life.
14. Turn on the UPS by pressing the On button; then turn on the connected load
equipment. The UPS is ready for normal operation.
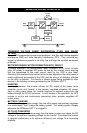
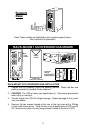
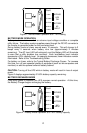
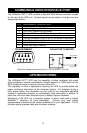
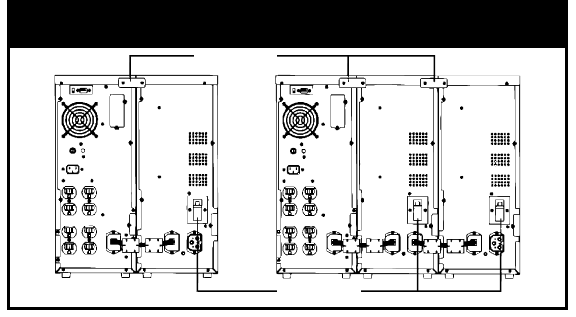
Battery Cabinet Installation Diagram
SECURING PLATE
BREAKER