


EtherFast Cable/DSL Router
13
Instant Broadband Series
12
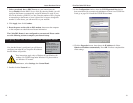
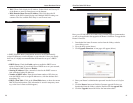
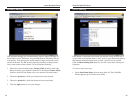
3. In the Configuration window, select the TCP/IP protocol line that has
been associated with your network card/adapter. If there is no TCP/IP line
listed, go to page 39 to install the TCP/IP Protocol now.
4. Click the Properties button, then choose the IP Address tab. Select
Obtain an IP address automatically. Press OK. You have completed the
client settings.
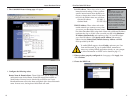
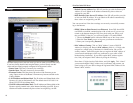
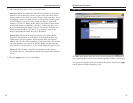
7. Unless you already have a DHCP server on your internal network,
choose Enable from the DHCP Server field. By choosing Enable, you will
configure the Router to automatically assign IP addresses to each of your
PCs. In the Number of DHCP Users box, enter the number of PCs you plan
on networking to the Router, or leave it alone. Don’t forget to change this
number if, in the future, you add more PCs to your network.
8. Click Apply, then click Continue.
9. Reset the power on the cable or DSL modem, then restart the computer
so the computer can obtain the new Router information.
The Cable/DSL Router is now configured to your network. Please contin-
ue to the following section to complete your network setup.
Now that the Router is configured, you will have to
configure your other PCs to accept the IP addresses
that the Router will provide.
These instructions apply only to Windows 95 and Windows 98
machines. For TCP/IP setup under Windows NT, please refer to
your Windows NT manual.
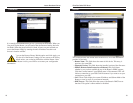
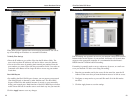
1. Click the Start button, select Settings, then Control Panel.
2. Double-click the Network icon.
Configuring Your PCs to Connect to the Cable/DSL Router
NNoottee::
Make sure that a
Network Card or
Adapter has been suc-
cessfully installed into
each PC you plan on
configuring prior to
continuing.