


(this is recommended, although OMS will sense that it is on and prompt
you to turn it off). If you are configuring OMS for the first time, follow
these instructions to configure OMS.
1. In the Opcode folder, which you will find on your hard drive, locate the
OMS Applications folder,“then OMS Setup.” Double-click on OMS Setup.
2. OMS will inform you that it has not yet been configured. Click OK.
3. The “Create a New Studio Setup” dialog box now appears. Click OK.
4. The “OMS Driver Search” dialog asks you to choose the port on which
you’ve attached the Audiophile USB MIDI (either Modem or Printer).
DO NOT choose a port, just click “Search.” OMS begins Searching.
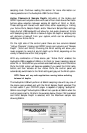
5. “OMS Driver Setup” shows the “Audiophile USB” MIDI in a list when
OMS successfully finds the driver. Click OK. OMS will now define
(shows “Identifying”) the Audiophile USB output port.The “OMS MIDI
Device Setup” dialog box will appear showing the Audiophile’s output
port with a check box to the left of the port, indicating that the port
is enabled. Now click on OK.
6. Next, the “My Studio Setup” appears with a “file save” dialog box over
it.You will now need to save your new Studio Setup before you can
assign an instrument to the Audiophile’s MIDI output and input.Assign
your instrument and you are done.You may now exit OMS Setup by
quitting the application.
Macintosh OS X Installation
1. Insert the Audiophile USB Driver CD into your CD-ROM Drive and
open the CD to view its contents.
2. Double click "M-Audio Audiophile USB Installer.dmg" file. An Icon will
appear on your desktop marked " Audiophile USB."
3. Double click the " Audiophile USB " icon on your desktop.
4. Now double click on the "M-Audio Audiophile USB Installer.mpkg."
5. You will need your Administrator Password for the next step. To
continue,click the lock icon in the lower left corner of the window that
states,“Click The Lock To Make Changes."
6. Enter your password and click "OK."
7. The next window "Welcomes You..." to the installation process.
Click "Continue."
8. Select your OS X hard drive. Click "Continue."
9. When prompted, click "Upgrade" to continue.
10. When prompted, click "Continue Installation."
11. When prompted, click "Restart" to finish the installation.
12. After the computer has restarted, now plug the Audiophile USB into
your computer’s USB Port.
8