


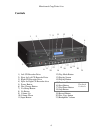
Microboards CopyWriter Live
11
CD Tools
The CD Tools menu item allows you to close an open Audio CD. It also allows you to
erase a CD-RW disc. Press Yes/Setup when you have selected the CD Tools entry on
the Setup Menu. There are 3 options under the CD Tools menu:
Close Disc
In order for a recorded disc to play back correctly in other players, the disc must be
closed. If you press Stop to stop your recoding, then the disc is closed and can be played
on other playback devices. If you press Pause while recording a disc, recording will stop,
but the disc is not closed. Playback of this disc is only possible on the CopyWriter Live
system.
If you press Pause while recording a project and then decide you do not want to record
any additional information to that CD, you can close the disc by selecting Close Disc in
the CD Tools Menu.
Press the No button until you reach the drive you wish to close, either the left or right
drive. Press Yes/Setup to start the process. The message Closing Disc will flash until
the disc is closed.
After the closing of the disc is complete, press the Yes/Setup screen to return back to the
CD Tools menu.
Quick Erase/Full Erase
The CW Live can erase CD-RW media. You have the choice of doing a quick erase or a
full erase. Just place the CD-RW disc in either or both drives and press the Yes/Setup
button at the left or right drive. The message Erasing CD will flash on the display until
the process is complete. Once the erase is completed, press the Yes/Setup button to go
back to the CD Tools menu.
Track Extraction
This menu option allows you to extract tracks from one master and burn them to a blank
disc. To use this feature, follow the directions below:
1. Press Yes/Setup at the Track Extraction menu selection in the Setup menu to
begin.
2. The display will read Extraction OK? Press Yes/Setup, and the drives will eject.
Place the master disc in one drive and a blank in the other and close the drive
trays. The master will run through a track analysis. It does not matter in which
drive the master is placed.
3. After the master is analyzed, the display will read EXTRACT THE TRK?,
followed by TRACK 01/XX, where XX is the number of tracks on the master.
Press Yes/Setup to select the track or No to not select the track.
4. Repeat step 3 until all tracks on the master have been offered for extraction.
5. After the last track on the master, the display will read End Extraction? Press
Yes/Setup to begin burning the selected tracks to the blank disc. Press No if you
wish to change your selections; you will run through steps 3-5 again.