


15
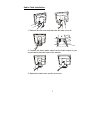
The centre section will clearly show the alternating black and white lines
or a uniform level of noise will appear across the image. Close the clock
submenu by pressing Exit.
6. Use the wheel to select Horizontal Position and press Enter.
7. Adjust the horizontal position so that the image is centered. Its width
should be the same as the visible width of the screen. Press Exit.
8. If some noise or distortion is still visible in the centre section of the test
pattern, turn the wheel to select Phase and press Enter.
9. Adjust the Phase of the monitor’s sampling clock by turning the wheel to
optimise the displayed image. The alternating black and white lines
should be clearly visible. Press Exit.
10. Press Exit twice and the OSD menu will ask you if you wish to save your
changes. Select Yes using the wheel and press Enter when the Yes
indicator turns blue.
If you are still not satisfied with the result, try repeating the procedure using a
graphics signal that has a different refresh rate.
Notes:
You must use one of the factory modes. If the AUTO button is not working,
or the NON PRESET MODE message is shown on the OSD you are not
using one of the supported modes. If you are having difficulties generating a
supported mode, ask your computer dealer or the distributor or manufacturer
of your graphics card for assistance.
The procedures described in this chapter should be performed for every
resolution and type of graphics signal that you wish to use. For example, if a
particular application requires a resolution of 800 x 600 pixels, but all other
applications use the monitor’s native resolution, you will need to display the
test pattern and make adjustments twice.
The monitor will remember your settings and use them whenever you turn
the monitor on. Note that you may need to readjust the monitor if it is
connected to a different computer or if the computer’s graphics adaptor is
replaced.