EN-26
How to set the menus:
The following describes how to set AUTO POWER
OFF time as an example.
Press the MENU button.
IMAGE
opt.
AV MEMORY 1
Press the W or X button to select a menu to use.
INS T ALL A TION
opt.
A V MEMO R Y 1
Press the ENTER button (or T button).
opt.
AV MEMORY 1
INSTALLATION
KEYSTONE 0
1.
2.
3.
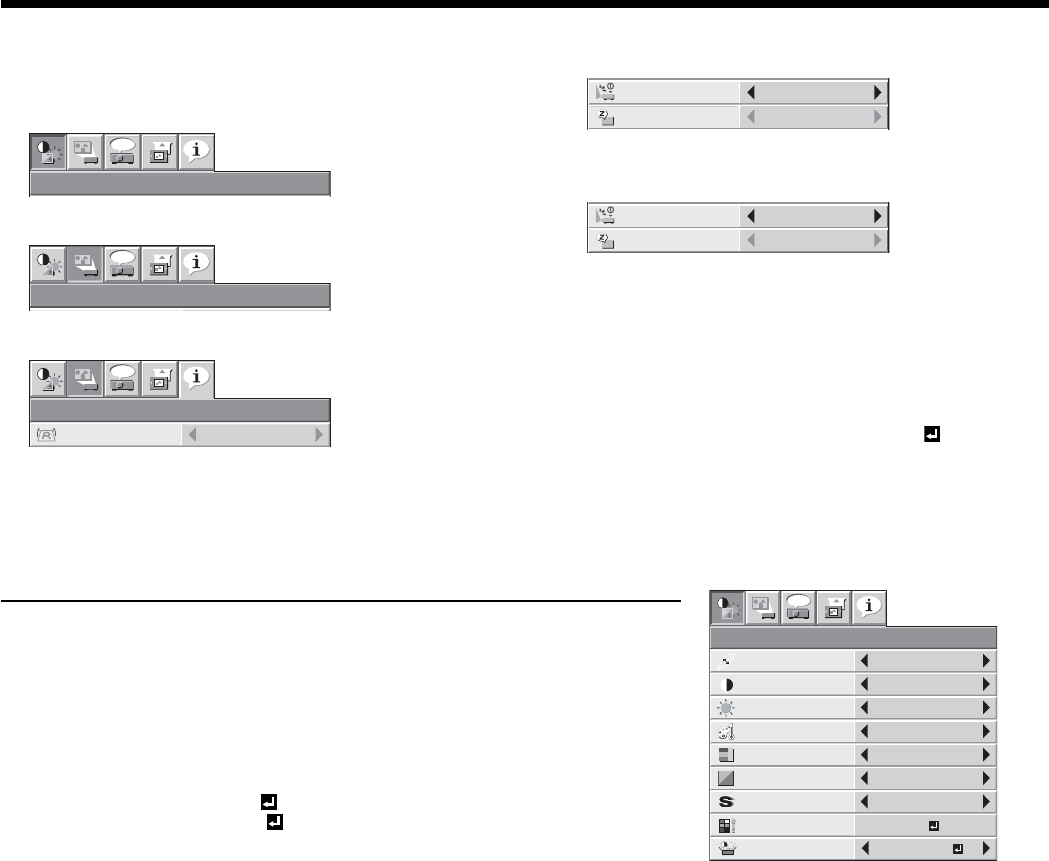
1. IMAGE menu
ITEM SETTING FUNCTION
CONTRAST
IMAGE
0
BRIGHTNESS 0
0
COLOR
OK
MEDIUM
0
TINT
0SHARPNESS
COLOR TEMP.
ADVANCED MENU
opt.
AUTOGAMMA MODE
AV MEMORY 1
AV MEMORY
SAVE
AV MEMORY1
GAMMA MODE AUTO The proper gamma mode is
automatically selected depending on
the input signal. Default is AUTO.
SPORTS This is a bright mode suitable for
watching sports images.
VIDEO This is a standard mode suitable for
watching video images, etc.
CINEMA This is a mode for watching movies in
dim lighting as in a theater.
USER1
/
USER2
Select to adjust the gamma curve. (See
page 33.)
CONTRAST ±30 Use to adjust the contrast of the
projected image. (See page 31.)
BRIGHTNESS ±30 Use to adjust the brightness of the projected image. (See page 31.)
COLOR TEMP. 5 options Use to adjust the color temperature. (See page 32.)
COLOR ±10 Use to adjust the color thickness of the projected image. (See page 31.)
TINT ±10 Use to adjust the color tint of the projected image. (See page 31.)
SHARPNESS ±10 Use to adjust the sharpness of the projected image. (See page 31.)
ADVANCED MENU
SCREEN SIZE 2 options Select according to the screen size.
VERTICAL LOCATION
±26 Use to adjust the position (height) of the projected image.
AUTO IRIS AUTO / OFF Select the operation mode of the auto iris. (See page 32.)
TRNR 0 - 15 Use to reduce random noise. (See page 33.)
MNR 0 - 15 Use to reduce mosquito noise. (See page 33.)
BAR ON / OFF Use to reduce block noise. (See page 33.)
CTI 0 - 5 Use to correct smeared color boundaries.
INPUT LEVEL ±5 For analog signal input: The input level of video signal differs among devices to be
connected. High input level causes solid white in displayed image and low input
level causes displayed image to get dark. Use this menu to adjust the input level of
analog video signal.
AUTO /
ENHANCED /
NORMAL
For digital signal input:
AUTO: The proper setting is automatically selected.
ENHANCED: Select when solid black occurs.
NORMAL: Select when grayish black occurs.
(See page 16.)
OPTION FILTER
ON / OFF Select ON when the separately available option fi lter (see page 46) is attached
to the lens. The color temperature is corrected depending on the option fi lter
attached.
AV MEMORY SAVE
3 options Select the AV MEMORY to which you save the current setting. (See page 30.)
By using the AV memory function, you can save up to 3 setting patterns of IMAGE menu for each input terminal. (See
page 30.)
INPUT LEVEL is unavailable when the digital signal is supplied from the YC
B
C
R
/YP
B
P
R
terminal of the connected device.
•
•
Available settings in the menus
Set the following items on their relevant menus.
Press the S or T button to select an item to
adjust.
OFF
AUTO POWER
ON
OFF
AUTO POWER
OFF
Set the selected item by pressing the W or X
button.
30 min
AUTO POWER
ON
OFF
AUTO POWER
OFF
To cancel the menu:
Press the MENU button several times.
Important:
When the MENU button doesn’t function, unplug
the power cord from the wall outlet. Wait about 10
minutes, plug the power cord in, and try again.
After selecting the items marked with
, press the
ENTER button.
4.
5.
6.
•
•
Menu operation (continued)
1. IMAGE menu


