


- 15 -
ENGLISH
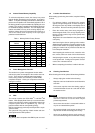
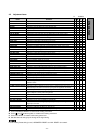
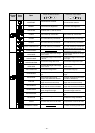
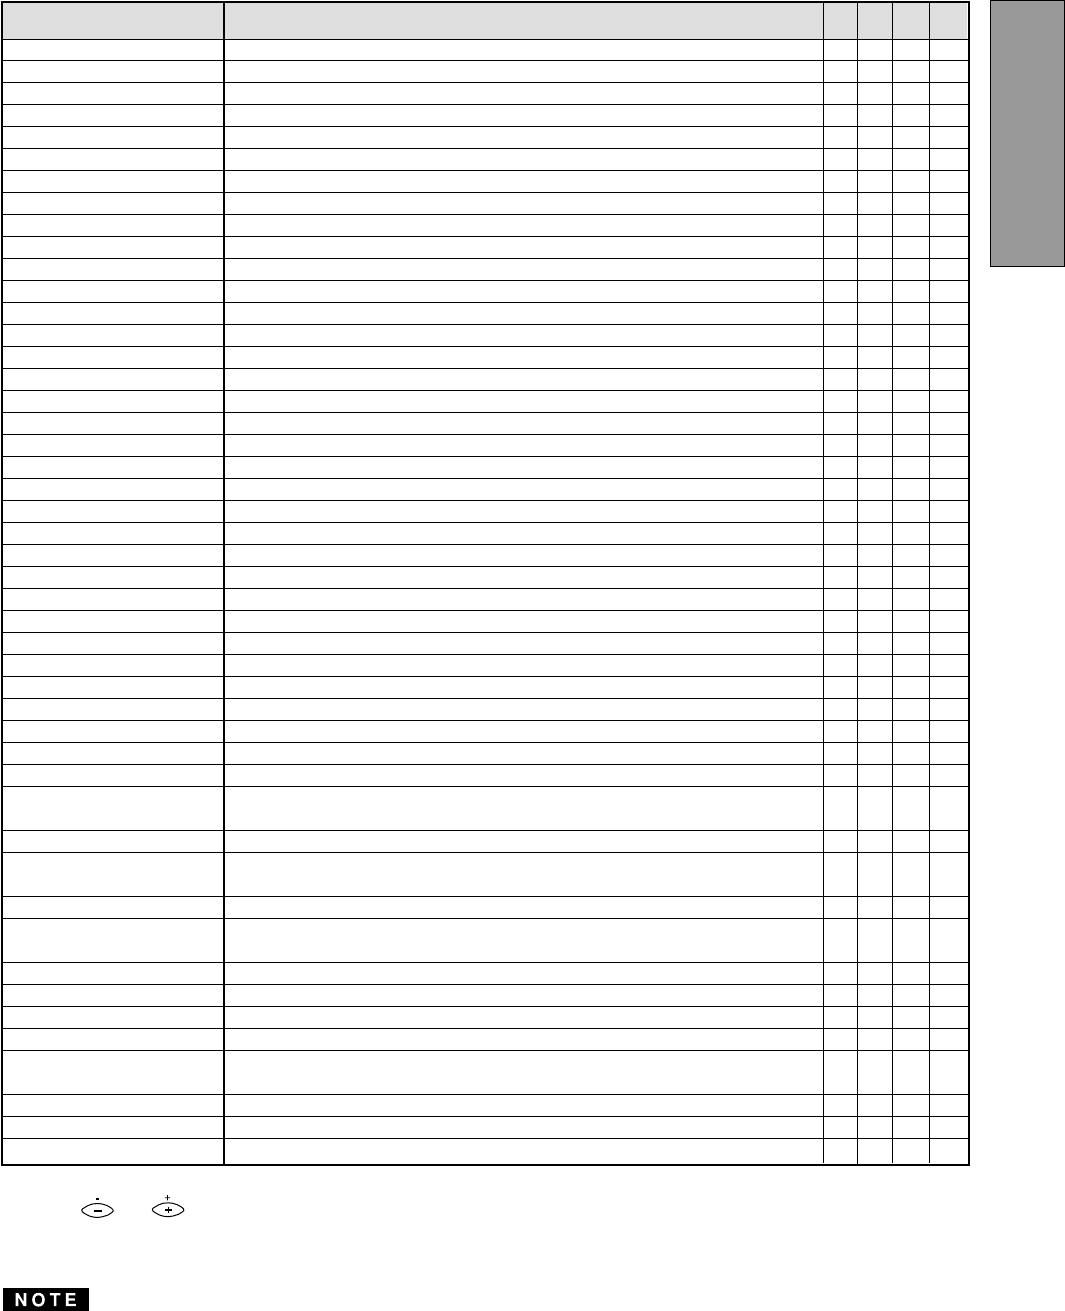
CONTRAST Adjusts the contrast level. X X X
BRIGHT Adjusts the black level of the screen X X X
COLOR NO Select the desired color from Color 1, Color 2, and Color 3 presets. X
R-GAIN Adjusts the red-color balances for the selected color. X X X
G-GAIN Adjusts the green-color balances for the selected color. X X X
B-GAIN Adjusts the blue-color balances for the selected color. X X X
COLOR TEMPERATURE Adjusts the color temperature of the image on the screen. X X X
COLOR RESET Restores the each color gain and color temperature to the factory preset. - - - -
HORIZ-SIZE Adjusts the horizontal size of the image on the screen. X X X
HORIZ-PHASE Adjusts the horizontal position of the image on the screen. X X X
HORIZ-POSITION Adjusts the horizontal position of the screen raster. X X X
VERT-SIZE Adjusts the vertical size of the image on the screen. X X X
VERT-POSITION Adjusts the vertical position of the image on the screen. X X X
PINCUSHION Straightens the left and right sides of the image on the screen. X X X
KEYSTONE Adjusts the parallelism of the left and right sides of the image on the screen. X X X
TOP-PIN Adjusts the pincushioning at the top corners of the screen. X X X
BOTTOM-PIN Adjusts the pincushioning at the bottom corners of the screen. X X X
PIN-BALANCE Adjusts the curvature of the left and right sides of the image on the screen. X X X
KEY-BALANCE Adjusts the vertical slant or tilt of the screen image. X X X
ROTATION Adjusts the rotation of the image on the screen. X X X
ZOOM Zooms the screen to all sides. X X X
GEOMETRY RESET Restores to the factory preset level.(See "NOTE" below.) - - - -
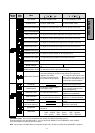
TEXT MODE To get a preferable image for your work. X
BLACK LEVEL Select the black level of the screen. X
HORIZ-CONVERGENCE Adjusts the horizontal alignment of the red, green and blue beams. X X X
VERT-CONVERGENCE Adjusts the vertical alignment of the red, green and blue beams. X X X
VERT-CONV-TOP Adjusts the upper vertical alignment of the red, green, and blue beams. X X X
VERT-CONV-BOTTOM Adjusts the bottom vertical alignment of the red, green, and blue beams. X X X
HORIZ-CONV-RIGHT
Adjusts the horizontal alignment of the red, green and blue beams on the right part of screen.
XXX
HORIZ-CONV-LEFT
Adjusts the horizontal alignment of the red, green and blue beams on the left part of screen.
XXX
CORNER PURITY (TL) Adjusts the purity of the top-left corners of the screen. X X X
CORNER PURITY (TR) Adjusts the purity of the top-right corners of the screen. X X X
CORNER PURITY (BL) Adjusts the purity of the bottom-left corners of the screen. X X X
CORNER PURITY (BR) Adjusts the purity of the bottom-right corners of the screen. X X X
MOIRE CANCEL When setting to ON, the moire level on the screen can decreased by the MOIRE X
CANCEL LEVEL.
MOIRE CANCEL LEVEL Adjusts the moire level on the screen. X X
CLAMP PULSE POSITION Uses this function to eliminate excessive green or white background that may occur X
when both Sync-On-Green and external sync signals are applied to the monitor.
DEGAUSS Eliminates possible color shading or impurity. - - - -
POWER SAVE
When setting to ON, the power consumption of the monitor will be reduced when not in use
XX
if your computer is set for power management.
CONTROL LOCK Locks the OSD function except for "BRIGHT" and "CONTRAST". X
OSD POSITION Moves the OSD screen position. X X
ALL RESET Restores all items to the factory preset level.(See "NOTE" below.) - - - -
GTF AUTO ADJUST Adjusts the screen size and distortion automatically. - - - -
DIAGNOSIS Indicates the current scanning frequency, factory or user preset timing number, and - - - -
signal input connector.
LANGUAGE Selects the language used on OSD screen. X
USB UP-STREAM Selects the Upstream port which you want to use. X X
USB PORT COMBINATION Selects the combination of the Upstream port and signal input connector. X X
Items
Function A B C D
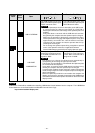
A. Press "GEOMETRY RESET" to restore to the factory preset level.
B. Press and buttons together, to restore to the factory preset level.
C. Press "ALL RESET" to restore to the factory preset level.
D. Set data does not change by the change of the signal timing.
4.2 Adjustment Items
X: Available
If a non-Factory Preset timing is used, "GEOMETRY RESET" and "ALL RESET" do not work.