


Chapter 2 Installation and Configuration
NI PXIe-8105 User Manual 2-4 ni.com
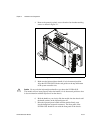
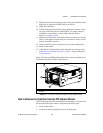
3. Press the injector/ejector handle down.
4. Slide the unit out of the chassis.
BIOS Setup
You can change the NI PXIe-8105 configuration settings in the BIOS
setup. The BIOS is the low-level interface between the hardware and PC
software that configures and tests your hardware when you boot the system.
The BIOS setup program includes menus for configuring settings and
enabling NI PXIe-8105 controller features.
Most users do not need to use the BIOS setup program, as the
NI PXIe-8105 controller ships with default settings that work well for most
configurations.
Caution Changing BIOS settings may lead to incorrect controller behavior and possibly
an unbootable controller. If this happens, follow the instructions for restoring default
settings in the System CMOS section. In general, do not change a setting unless you are
absolutely certain what it does.
Entering BIOS Setup
To start the BIOS setup utility, complete the following steps:
1. Power on or reboot your NI PXIe-8105 controller.
2. When the message
Press <DEL> to enter SETUP appears, press
the Delete key on the keyboard. The message
Entering Setup
appears, and the setup program is loaded after a short delay.
3. When you first enter the BIOS setup program, it displays the Main
menu.
Use the following keys to navigate through the BIOS setup:
• Left Arrow, Right Arrow—Use these keys to move between the
different setup menus. If you are in a submenu, these keys have no
effect, and you need to press <Esc> to leave the submenu first. (To use
the arrows on the numeric keypad, you must turn off Num Lock.)
• Up Arrow, Down Arrow—Use these keys to move between the
options within a setup menu. (To use the arrows on the numeric
keypad, you must turn off Num Lock.)
• <Enter>—Use this key either to enter a submenu or display all
available settings for a highlighted configuration option.