


Chapter 3 PXI Serial Hardware Installation, Verification, and Configuration
Serial Hardware and Software for Windows 3-2 ni.com
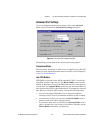
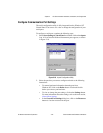
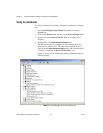
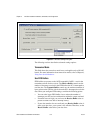
9. Windows 2000 should automatically detect your hardware and display
the Found New Hardware Wizard. Complete the wizard by clicking
Next in each window and then Finish. When you complete the wizard,
continue to the Verify the Installation section.
If the Found New Hardware Wizard does not appear, refer to the
Forcing Windows to Detect Your Hardware section in Appendix D,
Troubleshooting and Common Questions.
Install the Hardware
Caution
Before you remove your board from the package, touch the antistatic plastic
package to a metal part of your system chassis to discharge electrostatic energy, which can
damage several components on your serial board.
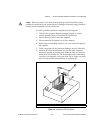
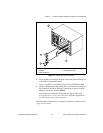
To install your PXI serial board, complete the following steps:
1. Turn off your PXI or CompactPCI chassis. Keep the chassis plugged
in so that it remains grounded while you install the PXI serial board.
2. Find an unused PXI or CompactPCI 5 V peripheral slot.
3. Remove the corresponding filler panel.
4. Touch a metal part on your chassis to discharge any static electricity.
5. Insert the PXI serial board into the 5 V slot. Use the injector/ejector
handle to fully inject the device into place. Figure 3-1 shows how
to install the PXI serial board into a PXI or CompactPCI chassis.