


Chapter 2 PCI Serial Hardware Installation, Verification, and Configuration
© National Instruments Corporation 2-9 Serial Hardware and Software for Windows
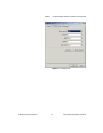
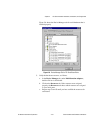
Use FIFO Buffers
FIFO buffers are present on the 16550-compatible UARTs—one for the
transmitter and one for the receiver. The Receive Buffer control sets the
number of characters received in the FIFO before the PC is interrupted to
read the data. The Transmit Buffer control sets the maximum number of
bytes written to the FIFO in a block when the PC is interrupted to write the
data. When you configure FIFO settings, consider the following points:
• You can select larger FIFO buffer sizes to reduce the number of
interrupts your PC receives and therefore minimize system overhead.
• If transfer rates are high, you can lower the Receive Buffer value to
prevent overrun errors due to interrupt latency.
• If your data transfer sizes are small and your Receive Buffer value is
above your data sizes, your system is less efficient. Therefore, set the
Receive Buffer value below your data sizes.
Restore Defaults
To reset the fields to their default values at any time, click on the Restore
Defaults button.
Windows Me/9x
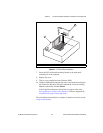
Install the Software
Before you install your serial hardware, complete the following steps to
install the NI-Serial software for Windows Me/9x:
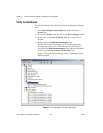
1. Select Start»Settings»Control Panel.
2. Double-click on the Add/Remove Programs icon. The Add/Remove
Programs dialog box appears.
3. ClickontheInstall button.
4. When prompted, insert the NI-Serial Software for Windows
2000/NT/Me/9x CD,andclickontheNext button.
5. When prompted, click on the Finish button to install the program files
from floppy disks or CD-ROM.
6. The setup wizard begins. The setup wizard guides you through the
necessary steps to install the NI-Serial software. To exit the setup
wizard at any time, click on the Cancel button.
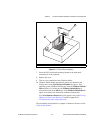
7. If you need toinstall your hardware, or if this is your first time to install
the NI-Serial software for Windows Me/9x, skip to the next section,
Install the Hardware. Otherwise, continue to step 8.