


NCR RealScan 7883 Installation and Owner Guide
04/04 497-0424789 Release F
8 of 75
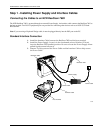
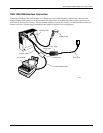
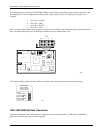
Step 1 - Installing Power Supply and Interface Cables
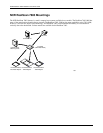
Connecting the Cables to an NCR RealScan 7883
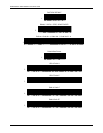
The NCR RealScan 7883 is powered through an external Power Supply. An interface cable connects the RealScan 7883 to
the host terminal. Two RS-232 peripheral ports are provided for connecting other devices such as an NCR 7837 Hand-
Held Scanner.
Note: If you are using a Keyboard Wedge cable, it must be plugged directly into the PS/2 port on the PC.
Standard Interface Connection
1. Install the Interface Cable between the RealScan 7883 and the host terminal.
2. Install the Power Supply. Locate it in the checkstand at least 10 inches (25.4 cm)
from the RealScan 7883 installed position. Be sure to locate the Power Supply where
spilled liquids cannot fall onto it.
3. Fasten a Tie-Wrap around the Power Cable and the Interface Cable to help secure
the Power Cable.
RealScan 7883
D
C
Interface Cable
Host Terminal
19767
RealScan 7837
Power Supply
Power Cable
Power Cable