


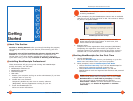

Each time a receipt is scanned into a Folder, a new row is added to the
Receipts Grid. Where possible, key data from the receipt is
automatically placed into the appropriate columns within the row.
NeatReceipts attempts to read the following fields:
• Transaction date
• Total amount
• Payment type
• State sales tax (USA)
• Vendor name
• Category
• PST/QST and GST/HST sales tax (Canada)
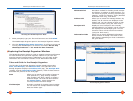
After each scan you will want to review and verify the data. To modify
any of the information, click in a grid cell and edit as necessary.
NeatReceipts has a built in vendor database of over 1500 popular
stores, restaurants, and hotels that it can recognize. Each vendor name
is automatically associated with an expense category, such as
"Restaurant".
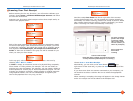
Although NeatReceipts may not have the name of your neighborhood
supermarket in its database, you can easily add it so that it will
recognize it the next time. To add a vendor name simply click into the
vendor name field and type it in. If you enter an expense category for
that vendor name, it will remember that as well.
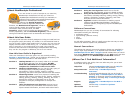
That’s it! NeatReceipt automatically saves the receipt for you. (How’s
that for convenient?!)
NOTE: Additional information on managing vendor
names can be found in Section 3: Working with
Receipts.
IMPORTANT: Note that NeatReceipts currently does not
read vendor names that are stylized text or logos, only
plain text. Keep this in mind when adding vendor names
as you must type them exactly as they appear on the
receipt.
C.
Verify data / Add a
vendor name
NeatReceipts Professional User Guide
Section 2: Getting Started
16