


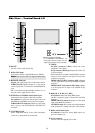
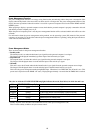
14
POWER
ON
POWER
OFF
RGB 1
RGB 2
POSITION / CONTROL
RGB 3
EXIT
PROCEED
VIDEO
CONTRAST
RGB/VIDEO
BRIGHT
COLOR
VIDEO
TINT
SHARPNESS
VISUAL
NORMAL
RASTER
NORMAL
ID SELECT CLEAR
1
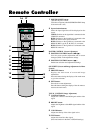
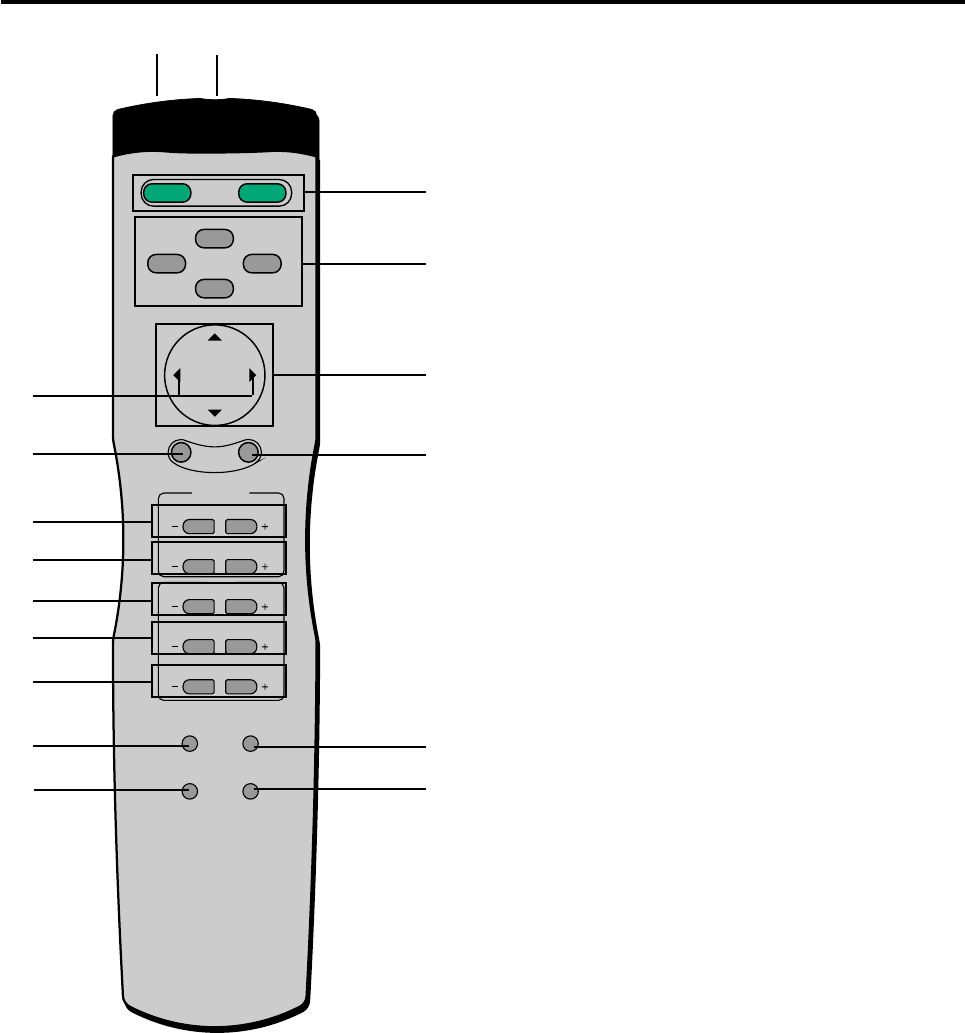
1 POWER ON/OFF button:
Switches the power on/off.
(This does not operate when POWER/STANDBY lamp
of the main unit is off.)
2 Input selection buttons:
Select the input signal that will be displayed on the
screen.
VIDEO: Switches to the signal that is connected to the
VIDEO IN connector.
RGB1: Switches to the signal that is connected to the
RGB1 IN (mini D-sub 15-pin) connector.
RGB2: Switches to the signal that is connected to the
RGB2 IN (BNC type: R, G, B, H/CS, V) connector.
RGB3: Switches to the signal that is connected to the
RGB3 IN connector.
RASTER CONTROL (Screen Adjustment)
3 POSITION/CONTROL buttons (▲▼
ᮤ
ᮣ
):
Used for screen position adjustment and on-screen
manager (OSM) mode adjustment settings.
4 POSITION/CONTROL buttons (
ᮤ
ᮣ
):
Enable item selection and adjustments/settings.
ON SCREEN (Screen and Image Adjustment via Menu
Control)
5 PROCEED button:
Displays the main menu of screen and image
adjustments.
Press this button during the display of the main menu
to go to the sub menu.
6 EXIT button:
Exits the on-screen adjustments.
Press this button during the display of the sub menu to
return to the main menu.
VISUAL CONTROL (Image Adjustment)
7 CONTRAST button:
Adjusts the contrast of the RGB signal and the video
signal.
8 BRIGHT button:
Adjusts the brightness of the RGB signal and the video
signal.
9 COLOR button:
Adjusts the density of the video signal colors.
10 TINT button:
Adjusts the tint of the video signal.
(Does not function in the PAL or SECAM settings.)
2
4
6
7
8
9
10
11
12
14
16 17
3
5
13
15
Remote Controller