


E – 12
OFF
+
-
PICTURE
ADJUST
ABC DEF
GHI
JKL MNO PQR
STU
,.
UNDO CANCEL
TEST
PICTURE
KEYSTONE AMPLITUDE ENTRYLIST
SOUND OSD
MUTE
MAGNIFY
HELPINFO.
POSITION AUTOPIXEL
VWX YZ?
WHITE BAL.
IMAGE
ON
POWER
MENU
ENTER
123
456
7
0
8
9
ADDRESS
PROJECTOR
R G B
LENS
SHUTTER
BS
+
-
+
-
FOCUS ZOOM
CTL
LENS
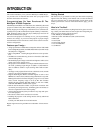
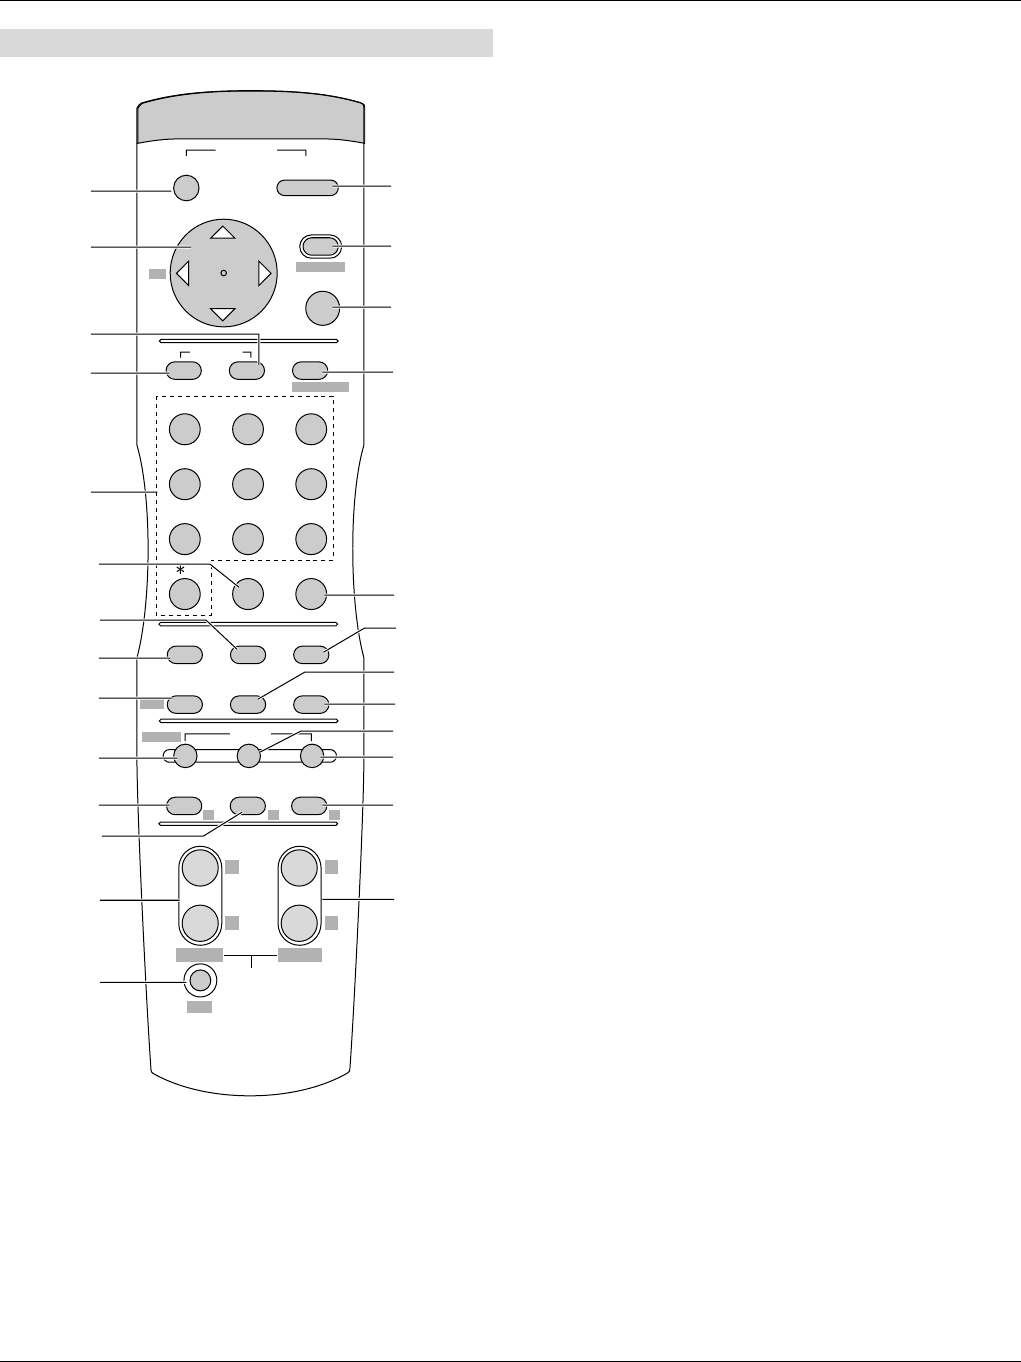
PEMOTE CONTROLLER
RD-364E
2
5
6
7
9
10
12
13
17
20
21
22
24
26
25
23
19
18
16
15
14
11
8
4
3
1
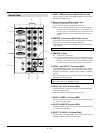
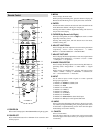
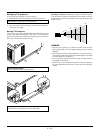
Remote Control
1 POWER ON
Press to turn on the projector. The POWER indicator lights up green.
2 POWER OFF
Press and hold this button for a minimum of two seconds to turn
off the projector.
3 MENU
Press to display the main menu.
While pressing and holding CTL, press this button to display the
Remote Control ID dialog box to specify the remote control ID.
4 ENTER
Executes the menu selection and activates items selected from the
menu. When the slidebar or dialog box is diplayed:
Pressing this button confirms adjustments/setting and returns to
the previous menu display.
5 CURSOR (Up/Down/Left/Right)
When pressed together, the CTL and ᮤ buttons work as a Back
Space key in the entry screen.
Pressing and holding CTL, then this button moves the menu,
slidebar or dialog box.
6 ADJUST WHITE BAL
Press to display the Color adjustment screen. Pressing this button
sequentially selects "Color Temperature" → "White
Balance"→"Switcher RGB Gain"→"Ref.White Bal".
7 ADJUST PICTURE
Press to display the Picture adjustment screen. Pressing this button
sequentially selects "Brightness" → "Contrast" → "Color" → "Hue"
→ "Sharpness" → "V-Aperture".
8 IMAGE/PROJECTOR
Press to display the Image Option screen. Pressing this button se-
quentially selects "Image Mode" → "Video Mode" → "Signal
Level"
While pressing and holding CTL, pressing this button rotates
"Timer" → "Menu" → "Setup" → "Link Mode" → "Switcher Con-
trol" → "External Control" → "Passcode".
9 INPUT
Use to select an input, to name a signal, or to enter a passcode
during input registration.
1--INPUT 1 for RGBHV/Y, Cb/Pb, Cr/Pr
2--INPUT 2 for RGBHV/Y, Cb/Pb, Cr/Pr
3--INPUT 3 for RGB
4--INPUT 4 for Y, Cb/Pb, Cr/Pr
5--INPUT 5 for VIDEO 1
6--INPUT 6 for VIDEO 2
7--INPUT 7 for S-VIDEO 1
8--INPUT 8 for S-VIDEO 2
9--INPUT 9 for RGB DIGITAL (Panel Link) input
0--INPUT 0 for SDI input on the optional SDI board
10 UNDO
Press to return the adjustments and settings to the previous condi-
tion. While pressing and holding CTL, pressing this button clears
all the menus or ajustment/setting screen. At this time the adjust-
ments/settings are stored in memory.
11 CANCEL
Press to exit the menu.
Press this button with CTL to return to the previous menu while
the menus appear. This feature allows you to adjust several items
concurrently.