


61
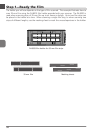
Step 4—Scan the Slide
The actual scan is performed using Nikon Scan (for detailed information on using Nikon Scan,
see the Nikon Scan 3 Software Manual).
Nikon Scan can be used as a “stand-alone” application for scanning images and saving them
to disk as described below. It can also be used to scan images directly into any application that
supports TWAIN (Windows) or Adobe Photoshop 5.0 acquire plug-ins (Mac OS 9 or earlier).
Nikon Scan can not be used to scan images into third-party applications in Mac OS X.
Windows
Select Nikon Scan from the application’s list of “Acquire” or “Import” sources.
Mac OS 9 or Earlier
Before starting the application, make sure that the Nikon Scan 3 plug-in (Nikon Scan Plugin
3.1) has been copied into the Import/Export folder in the application’s plug-in folder. You can
then scan images into the application by selecting Nikon Scan from the application’s list of
“Acquire” or “Import” sources.
For more information, see the documentation for the application in question.
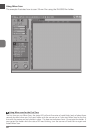
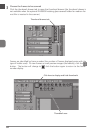
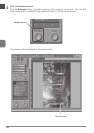
Making a Scan
Starting Nikon Scan
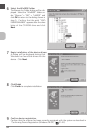
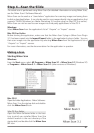
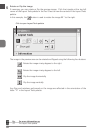
Windows
From the Start menu, select All Programs > Nikon Scan 3.1 > Nikon Scan 3.1 (Windows XP)
or Programs > Nikon Scan 3.1 > Nikon Scan 3.1 (other versions of Windows).
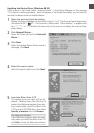
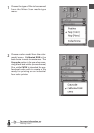
Mac OS 9 or Earlier
Open the Nikon Software folder in the loca-
tion to which you installed Nikon Scan (the
default location is the root directory of the
startup disk) and double-click the Nikon Scan
3.1 icon.
Mac OS X
Open the folder Applications : Nikon Software :
Nikon Scan 3 on the startup disk and double-
click the Nikon Scan 3 icon.