


GB
GB
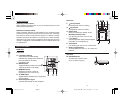
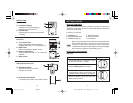
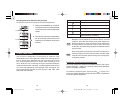
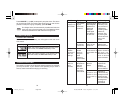
REMOTE UNIT
Front View
A. LCD Status Display
Displays the current temperature
measured by the remote unit.
B. LED Indicator
Flashes when the remote unit transmits
a reading.
Back View
C.
°C/°F Slide Switch
Selects temperature display between
degrees Fahrenheit (°F) or Centigrade (°C).
D. RESET hole
Returns all settings to default values.
E. Battery compartment
Accommodates two UM-3 or AA -sized 1.5V
batteries.
F. Battery Door
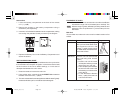
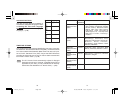
Remote Unit Accessories
G. Wall-Mount Holder
Supports the remote unit when
mounted on the wall.
H. Removable Table Stand
For standing the remote unit on a flat surface.
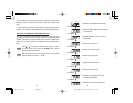
GETTING STARTED
PACKAGE CONTENTS
When you unpack this product, make sure to keep all the packing
materials in a safe place, in case you need to later transport the device
or return it for servicing.
In the box, you will find:
When using the product for the first time, the batteries have
already been installed in both the main and remote units.
Locate the clear plastic separator inside the battery
compartment. Remove the clear plastic, and close the battery
door. The device will then automatically turn on.
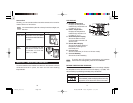
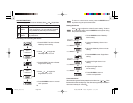
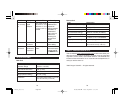
INSTALLING THE BATTERIES
Main Unit
¥ EMR898A unit ¥ Quick Start Guide
¥ Removable table stand ¥ Wall-mount holder
¥ THR268 remote unit ¥ User Manual
NOTE
1. Locate the battery compartment at the
back of the main unit (→ p.5,L.).
2. Slide the Battery Door to the right.
3. Insert two 1.5V alkaline AA batteries into the
compartment, making sure to align the
polarities correctly as shown by the diagram.
4. Place the Battery Door back onto the
Battery Compartment.
Instructions
Diagram
6 7
EMR898_GB(02/05) 12/1/03, 10:36 AMPage 8-9 Adobe PageMaker 6.5C/PPC