


11 (E)
ENGLISH
10 (E)
INV: This is used to invert the polarity of the key signal.
Use the inversion mode when the input is black text on a white base.
When the INV function is used with VIDEO IN 5 selected for the key
source and with the FS switch in the OFF position, only the Video Input 5
signal will be set to the FS ON status.
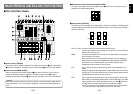
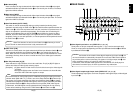
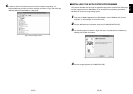
TColour Background Colour Selector Switch [COLOR]
This functions as the shift key of the Wipe Pattern Selection Switches. While it is pressed,
the Wipe Pattern Selection Switches can select the colour to be used for the colour
background, as shown below. The functions are indicated with red characters.
WH1: White 100% WH2: White 90% WH3: White 80%
YLW: Yellow CYN: Cyan GRN: Green
MGT: Magenta RED: Red BLE: Blue
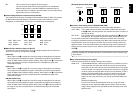
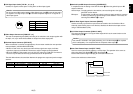
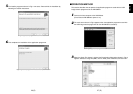
YWipe Direction Selection Switch [N/ N/R/ R]
To select one of the three directions in which to change the signals from A to B or vice
versa on the screen by moving Fader Lever i.
N (Normal):
When Fader Lever i is moved from A to B, the image is switched from the selected
A-bus signal to the selected B-bus signal in the direction of the black to white pattern
shown on Wipe Pattern Selection Switch. Similarly, when Fader Lever i is moved from
B to A, the image on the screen is switched from the selected B-bus signal to the
selected A-bus signal.
R (Reverse):
When Fader Lever i is moved from A to B, the image is switched from the selected
A-bus signal to the selected B-bus signal in the direction of the white to black pattern
shown on Wipe Pattern Selection Switch. Similarly, when Fader Lever i is moved from
B to A, the image on the screen is switched from the selected B-bus signal to the
selected A-bus signal.
N/R (Normal/Reverse):
When Fader Lever i is moved from A to B, the image is switched from the selected
A-bus signal to the selected B-bus signal in the direction of the black to white pattern
shown on Wipe Pattern Selection Switch. When Fader Lever i is moved from B to A,
the image on the screen is switched from the selected B-bus signal to the selected
A-bus signal.
[Example] Selected wipe pattern
UTransition Time Setting Controls [TRANSITION TIME]
These controls are used to set the transition time during auto fader operations.
AUTO TAKE: This is used to set the transition time of MIX or WIPE when the AUTO
TAKE u Switch has been pressed. Any transition time from 0 to about 10
seconds can be set.
KEY AUTO: This is used to set the transition time when the KEY AUTO I Switch has
been pressed. Any transition time from 0 to about 5 seconds can be set.
Turning either control knob counterclockwise reduces the transition time; conversely,
turning them clockwise increases the transition time. When either control knob is turned
counterclockwise as far as it will go, the transition time is set to 0 seconds, and the cut
operation results. Even when external takes are performed using external switches, the
settings of these controls remain in force. (When a switch has been connected to EXT
TAKE H)
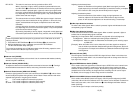
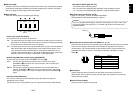
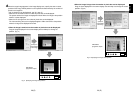
IKey Synthesis Setting Controls [KEY]
These are used to perform the settings relating to key synthesis.
GAIN, CLIP: The AW-SW350 features a linear key system for key synthesis to ensure
smooth synthesis, and these two controls are used to set the synthesis
levels when text and other data are to be synthesized with the key signals.
The CLIP control is for setting the reference level at which the key signals
are to be created, and signals above this level are synthesized. If noise is
present in the background images, set the CLIP level on the high side.
The GAIN control is for raising or lowering the level of the key signals.
Adjust it in such a way that the text, etc. can be synthesized cleanly and
clearly.
[Example of adjustment]
Turn the CLIP control counterclockwise as far as it will go and, while
viewing the screen, adjust the GAIN control to achieve clean and clear
images. Next, adjust the CLIP and GAIN controls alternately to set to the
optimum state.
WH1
YLW
WH2
CYN
RED
WH3
GRN
BLEMGT
ABAB
B
A
B
A BA
BA
BA
A
B
Fader lever Normal (N) Reverse (R) Normal/Reverse (N/R)
Before proceeding with auto fader operations, set the transition times in advance using
these controls.
Caution