7
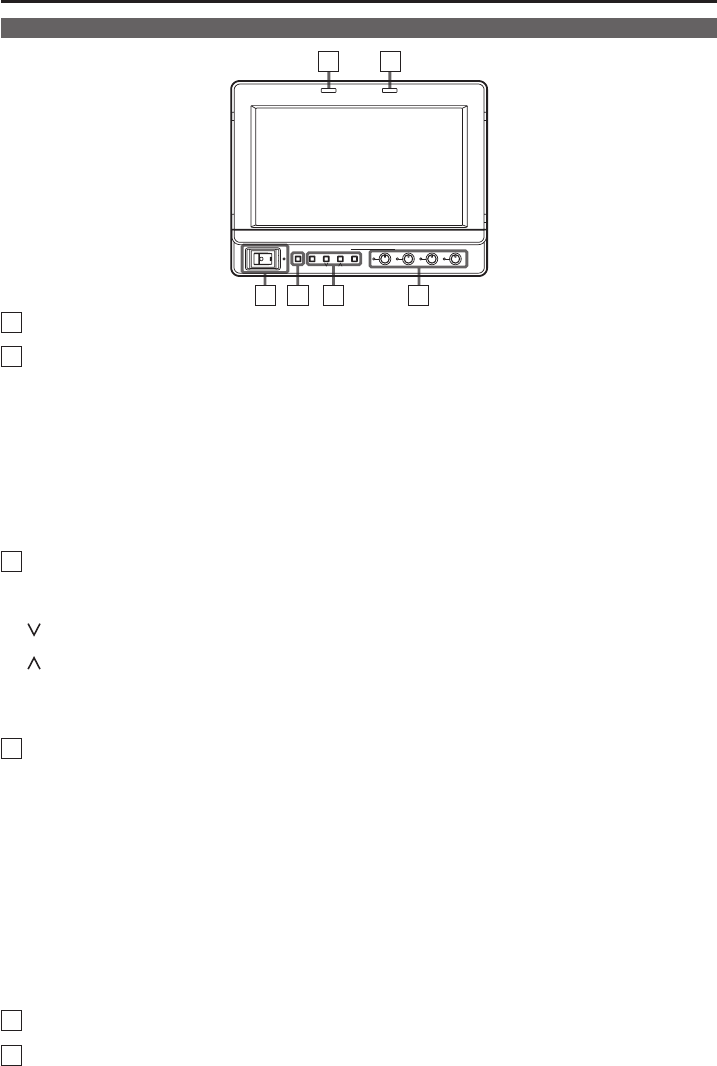
Front panel
Controls and Their Functions
1
POWER switch/lamp
This switches the power supply ON/OFF. When the power is ON, the LED (green) lights up.
2
INPUT SELECT button
This selects the signal input line. Each time the button is pressed, the input changes in the following order:
YPBPR → VF-YPBPR/VF-VIDEO → VIDEO → SDI.
YPBPR : Analog component input
VF-YPBPR / VF-VIDEO
∗
1
: Viewfinder input
VIDEO : Video input
SDI
∗
2
: Serial digital interface input (compatible with HD/SD)
• The input line when the power supply is switched ON is the one that was selected the last time the power was
switched OFF. The INPUT menu settings can be used to skip input lines that are not used.
• When the control lock is on, input lines cannot be selected.
∗
1 The menu is used to set either YPBPR or VIDEO for the viewfinder input.
∗
2 Can only be selected when the separately sold BT-YA80G is installed.
3
MENU and FUNCTION buttons
These are used for menu display, selecting settings and adjustments, and for carrying out the items selected in
the menu.
MENU : Push to display or exit the menu, or to return to the previous menu screen.
/ FUNCTION1 : Push to move the cursor down and select an item.
In addition, FUNCTION1 carries out the item selected in the menu.
/ FUNCTION2 : Push to move the cursor up and select an item.
In addition, FUNCTION2 carries out the item selected in the menu.
ENTER / FUNCTION3 : Push to confirm a setting, or to display a submenu.
In addition, FUNCTION3 carries out the item selected in the menu.
• When the control lock is on, the key mark appears and FUNCTION operations cannot be executed.
4
Picture adjusting knobs/lamps
PEAK [PEAKING] 0 - 30(0) / PHASE 0 - 60(30)
CHROMA 0 - 60(30) / FOCUS-R(→page 27) 0 - 30(25)
BRIGHT 0 - 60(30)
CONT [CONTRAST] 0 - 60(50) / B.LIGHT [BACKLIGHT] 0 - 60(60) ( ) denotes factory preset values
A rotating knob that can be pushed to operate. When the picture adjusting knob is pressed, its status is displayed
and adjustment becomes possible. The setting values are saved by pushing the knob again.
When values are changed from the factory preset values, the LEDs to the side of knobs (amber) light.
The setting values are loaded when the monitor’s power is switched ON. The setting values are saved when the
knob is pushed, or when 10 seconds pass after changing the settings. However, operating changes cannot be
made in the following cases.
• When the control lock is on, the key mark appears and setting values cannot be changed.
• Only items selected in the menu can be adjusted for PEAK/PHASE and CONT/B. LIGHT.
• When the MONO function is ON, PHASE and CHROMA operations are disabled.
• FOCUS-R is enabled during operations of the FOCUS-IN-RED function.
• During BLUE ONLY, the PEAK/PHASE knob functions as PHASE.
5
R-TALLY (red)
Can be lit by a control signal from a GPI/camera.
6
G-TALLY (green)
Can be lit by a control signal from a GPI/camera.
34
56
12
POWER
INPUT MENU
12
FUNCTION
3
ENTER
PEAK/
PHASE CHROMA
FOCUS-R
BRIGHT
CONT/
B.LIGHT


