


ENGLISH-15
Preparation
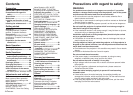
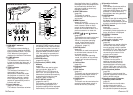
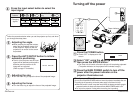
#RGB INPUT indicator
(page 26)
This indicator shows whether a
signal is being input to the RGB
input connectors (RGB 1 IN/RGB
2 IN). When an input signal is
detected, the indicator illuminates.
$LAMP indicator
(page 53)
This indicator illuminates when it
is time to replace the lamp unit. It
flashes if a circuit abnormality is
detected.
%TEMP indicator
(page 52)
This indicator illuminates if an
abnormally high or low
temperature is detected inside
the projector or around it. If the
temperature reaches a certain
level, the power supply will be
turned off automatically and the
indicator will flash.
&Power indicator
(page 23, 25 and 26)
This indicator illuminates red when
the MAIN POWER switch is turned
on (standby mode), and illuminates
green when the power is turned on
and a picture starts to be projected.
When the WEB STANDBY is set to
“ON”, the cooling fan operates and
the power indicator on the projector
flashes slowly in red.
'POWER button
(pages 23 and 25)
(Input select (VIDEO, RGB)
buttons
(page 24)
These buttons are used to select
the input signals. When AUTO
SEARCH in the OPTION menu is
set to “ON”, the input signal will be
detected and selected automatically
by pressing this button for a few
seconds. (Refer to page 45.)
)AUTO SETUP button
(pages 24 and 27)
If this button is pressed while a
picture is being projected, the
projection settings will be adjusted
automatically in accordance with
14-ENGLISH
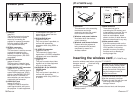
Projector control panel
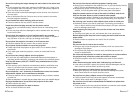
Remote control unit
.
/
0
#
$
%
&
' (
* + , -
)
'
(
)
2
3
+
1
,
-
4
*
8
5
6
7
9
AUTO SETUP
LASER
MENUVIDEO
Computer
PAGE
ENTER
R-CLICK
FREEZE
SHUTTER
Projector
FUNC1
STD
RGB
POWER
the signal being input. In addition,
the angle of tilt of the projector will
be automatically detected and
adjusted in order to correct any
keystone distortion.
*SHUTTER button
(page 28)
This button is used to
momentarily turn off the picture
and sound.
+MENU button
(pages 32 and 35)
This button is used to display the
menu screens. When a menu
screen is being displayed, this
button can be used to return to a
previous screen or to clear the
screen.
,Arrow (
FFGGII
and
HH
) buttons
(page 35)
These buttons are used to select and
adjust items in the menu screens.
*When in computer operating
mode, these buttons on the
remote control unit function
differently. (page 31)
-ENTER button
(page 35)
This button is used to accept and
to activate items selected in the
on-screen menus.
*When in computer operating
mode, this button on the remote
control unit functions differently.
(page 31)
.Laser emitter
(page 30)
/Infrared emitter
(page 22)
0Click button
(page 31)
This button can be used when the
operating mode select switch is
moved to the left (Computer).
1PAGE button
(page 31)
This button can be used when the
operating mode select switch is
moved to the left (Computer).
2Operation indicator
(page 30)
This indicator illuminates while a
laser beam is being emitted
(while the LASER button is being
pressed). It flashes when any
other buttons are being pressed.
3LASER button
(page 30)
A beam of laser light is emitted while
this button is being pressed. This
laser beam can be used as a pointer
to point to something on the screen.
4FREEZE button
(page 28)
This button is used to
momentarily freeze projection so
that a still picture is displayed.
5D.ZOOM +/- buttons
(page 29)
These buttons are used to
enlarge the projected image.
6VOLUME +/- buttons
(page 29)
These buttons are used to adjust the
volume of the sound that is output
from the projector’s built-in speaker
and AUDIO OUT jack. Refer to page
44 for details on how to adjust the
volume using the buttons on the
projector control panel.
7FUNC1 (function) button
(pages 41,44 and 46)
This button can be used for 1)
switching on and off the sound
volume and 2) entering into the
keystone distortion correction mode.
Use the FUNC1 item in the OPTION
menu to select which you wish to use.
8STD (standard) button
(page 36)
This button is used to reset the
projector adjustment values to the
factory default settings.
9Operating mode (Computer,
Projector) select switch
(page 31)
Move this switch to the left side to
use the remote control unit to
operate a computer, and move it to
the right side to operate the projector.