


7
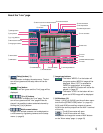
!4 Frame
Displays/hides the frame when a person is detected.
Refer to page 11 for further information.
!5 Track
Displays/hides the track of motion made by the
detected person.
Refer to page 11 for further information.
!6 Unit title
The unit title entered for "Unit title" on the [Basic] tab
will be displayed. (☞ page 20)
!7 Camera title
The camera title set for [Camera title] will be dis-
played. (☞ page 20)
!8 Alarm occurrence indication
button (*2)
This button will be displayed at an alarm occurrence,
and the channel of alarm occurrence (one of [1] to
[4] buttons) will light. When the button is clicked, the
button will disappear and the alarm output connector
will be reset. (☞ page 40)
!9 Full screen button
Images will be displayed on a full screen. To return
to the "Live" page, press the [Esc] key. When dis-
playing images on a full screen, the audio output
button will become unavailable.
@0 One shot button
Click this button to take a picture (a still picture). The
picture will be displayed on a newly opened window.
When right-clicking on the displayed image, the pop-
up menu will be displayed. The displayed image can
be saved on the PC by selecting "Save" from the
pop-up menu.
The displayed image can be printed from the printer
by selecting "Print" from the pop-up menu. The
newly opened window will be closed by clicking the
"Close" button.
@1 Mic input button (*3)
Turns on/off the audio reception (hear audio from
the unit on a PC). This button will be displayed only
when "Mic input" or "Interactive" is selected for
"Audio mode" on the setup menu. (☞ page 31)
When this button is clicked, the button will turn into
the button and audio from the unit will not be
heard.
Notes:
• When this button is clicked, audio from the PC will
be turned off.
When closing the window, click the button again to
turn on the audio.
• Audio reception is turned on for CH 1 only.
@2 Audio output button (*3)
Turns on/off the audio transmission (play audio from
the PC on the unit speaker). This button will be dis-
played only when "Audio output" or "Interactive" is
selected for "Audio mode" on the setup menu.
(☞ page 31)
The button blinks while the audio transmission is
being carried out.
When this button is clicked, the button will turn into
the button and audio from the PC will not be
heard.
Notes:
• When a user is using the audio transmission func-
tion, the mic input button and the audio output button
will be inoperable for the other users.
• Possible duration of audio transmission is up to 5
minutes per transmission. When 5 minutes have
passed, the audio transmission function will be can-
celed and the audio reception function will automati-
cally be turned on. To turn the audio transmission
function on, click the audio output button again.
• Audio transmission is turned on for CH 1 only.
@3 Time and date
Current time will be displayed in the set date/time
display format (☞ page 20).
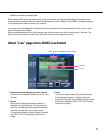
@4 Main area (*2)
Images from the camera will be displayed in this
area.
Click a desired point in the main area on the "Live"
page that is to be the centre of the angle of view.
The camera moves to adjust the position in order to
set the clicked point as the centre.
Note:
When using this function, set "PROPO.P/T" of cam-
era to ON. (☞ page 30)
The following cameras are available for the function.
WV-CS950 series, WV-CW960 series, WV-CW970
series (as of August 2007)