


9
4. Repeat the above step to adjust the level of the other
items.
5. To return to the menu setup display, press the MENU
button.
6. Move the cursor to the AFC (Automatic Frequency
Control) parameter with the C or D button, then select
either LONG or SHORT with the - or + button.
LONG: Receives input including noise or jitter such as
VCR playback or TV program.
SHORT: Receives input other than the above such as
camera output.
The factory default setting is SHORT.
7. Move the cursor to the CH DISPLAY parameter with the
C or D button, then select either ON or OFF with the
- or + button.
This item lets you enable or disable the display of the
input channel in the upper left corner of the monitor
screen.
ON: Always displays the input channel.
OFF: Displays the input channel for a few seconds
after the input selection is made.
The factory default setting is OFF.
8. Move the cursor to the STANDBY ON parameter with
the C or D button, then select the desired mode with
the - or + button.
These modes refer to the display mode in standby con-
dition when the STANDBY ON terminal is receiving
input from the outboard device.
MODE 1: Pictures are displayed with less brightness.
MODE 2: Monitor blackout, i.e., no picture is displayed.
IGNORE: Input signal is ignored. The display does not
change.
The factory default setting is MODE 1.
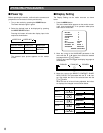
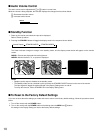
9. To reset the BRIGHT, CONTRAST, SHARPNESS,
COLOR, and TINT parameters to the default settings,
move the cursor to NORMAL SETTINGS with the C or
D button, then press the - or + button to restore the
factory settings.
BRIGHT -12
CONTRAST +8
SHARPNESS -16
COLOR -6
TINT -2
AFC LONG
CH DISPLAY OFF
STANDBY ON MODE 1
LANGUAGE ENGLISH
NORMAL SETTINGS
BRIGHT 0
CONTRAST 0
SHARPNESS 0
COLOR 0
TINT 0
AFC SHORT
CH DISPLAY OFF
STANDBY ON MODE 1
LANGUAGE ENGLISH
NORMAL SETTINGS
10. To exit the Display Setting menu, press the MENU but-
ton to return to the previous screen.