2. Hardware Installation and PC Setup
6218-A2-GB20-00 February 2005
2-3
Configuring Your PC’s IP Address
Before you start to access the router using the Ethernet connection, you must
configure your PC to use DHCP, or change your PC's TCP/IP address to be
192.168.1.x, where x is any number between 2 and 254, with a subnet mask of
255.255.255.0.
Your router's default IP address is 192.168.1.1.
Assigning an IP Address to your PC Automatically by DHCP
To use the router's DHCP feature, click in the radio button labeled “Obtain an IP
address automatically” instead of “Use the following IP address” in the following
procedures.
By default, the LAN port IP address of the router is 192.168.1.1. (You can change
this address, or another address can be assigned by your ISP.)
Windows XP
To configure the IP address under Windows XP:
Procedure
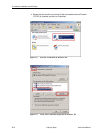
1. In the Windows task bar, click on the Start button, and then click on Control
Panel.
2. Double-click on the Network Connections icon.
3. In the LAN or High-Speed Internet window, right-click on the icon
corresponding to your network interface card (NIC) and select Properties.
(Often this icon is labeled Local Area Connection). The Local Area Connection
dialog box is displayed with a list of currently installed network items.


