


ISSUED: 08-15-07 SHEET #: 055-9491-6 06-21-10
Visit the Peerless Web Site at www.peerlessmounts.com
8 of 13
For customer care call 1-800-865-2112 or 708-865-8870.
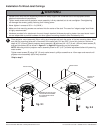
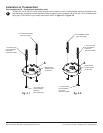
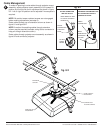
Installing Dedicated PAP Series Adapter
Plate (sold separately)
NOTE: The projector dedicated adapter plate you
are installing may differ in appearance from the
sample illustrated in fi gure 5.1.
Align shoulder of connection block (I) opposite notch
of adapter plate. Attach dedicated adapter plate to
connection block (I) using two #10-32 x 3/8" ser-
rated washer head socket pin screws (C) as shown
in fi gure 5.1.
NOTE: For PAP 35, PAP 40, and PAP 45 adapter
plates, use two #10-32 x 3/4" screws provided with
adapter plate in place of screws (C).
NOTE: Attach dedicated adapter plate to projector
(see PAP instructions) before proceeding to step 6.
DEDICATED
ADAPTER PLATE
(SOLD SEPARATELY)
C
NOTCH INDICATES
FRONT OF PROJECTOR
SHOULDER
5
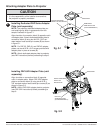
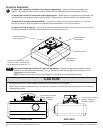
Attaching Adapter Plate to Projector
Installing PAP-UNV Adapter Plate (sold
separately)
Align shoulder on connection block (I) opposite
notch in adapter plate. Attach PAP-UNV adapter
plate to connection block (I) using two #10-32 x
3/8" serrated washer head socket pin screws (C) as
shown in fi gure 5.2.
NOTE: Attach PAP-UNV adapter plate to projector
(see PAP-UNV instructions) before proceeding to
step 6.
PAP-UNV
ADAPTER PLATE
(SOLD SEPARATELY)
NOTCH INDICATES
FRONT OF
PROJECTOR
SHOULDER
C
fi g. 5.1
fi g. 5.2
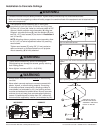
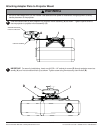
• It is the responsibility of the installer to ensure that
the projector is properly ventilated.
CAUTION
I
I