C1988M-B-ML (3/05) 7
ENGLISH
Lens Setup and Focus Procedures
Video Drive Auto Iris Lens
Set the lens mode selector switch to AIV. Switch the ESC and AGC OFF. Refer to the lens instructions
and adjust the lens for the optimum picture (video output level of 1V peak-to-peak). To focus, fully
open the iris by covering the lens with a suitable neutral density (ND*) filter. If the viewed scene is
6.5 feet (2 m) away or farther, set the lens focus to infinity (far). Use the back focus adjustment ring
(refer to the
Back Focus Adjustment
section) and focus on the selected scene. Remove the ND filter
and set the lens focus as required.
Direct Drive (DC) Auto Iris Lens
Set the lens mode selector switch to AID. Switch the ESC ON. Use an appropriate screwdriver to turn
the lens level potentiometer (refer to Figure 1) fully clockwise. Next, slowly adjust the potentiometer
counterclockwise until the optimum picture is obtained (video output level of 1V peak-to-peak).
To focus, fully open the iris by covering the lens with a suitable neutral density (ND*) filter. Select the
scene to be viewed. If the viewed scene is 6.5 feet (2 m) away or farther, set the lens focus to infinity
(far). Use the back focus adjustment ring (refer to the
Back Focus Adjustment
section) to focus on the
selected scene. Remove the ND filter and set the lens focus as required.
Fixed Lens
To focus, set the lens focus to infinity and view an image greater than 6.5 feet (2 m) away. Focus the
image with the back focus adjustment ring (refer to the
Back Focus Adjustment
section). Set the lens
focus as required.
Manual Iris Lens
To focus, open the iris fully and set the lens focus to infinity. View an image greater than 6.5 feet
(2 m) away. Focus the image with the back focus adjustment ring (refer to the
Back Focus Adjustment
section). Adjust the lens focus, and set the iris for the best picture quality. The largest aperture gives
the best light sensitivity, the smallest aperture the greatest depth of field.
Zoom Lens
Set the lens focus to infinity (far) and fully open the iris by covering the lens with a suitable neutral
density (ND*) filter. Zoom out to the widest field of vision and view a distant object. Adjust the back
focus adjustment ring until the object is in focus (refer to the
Back Focus Adjustment
section).
Next, zoom fully in and adjust the lens focus until the object is again focused. Repeat these steps until
the full zoom range may be viewed with the minimum loss of focus.
* NOTE:
For best results, outdoors, use an ND3 filter.
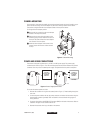
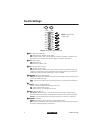
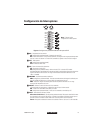
Back Focus Adjustment
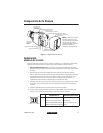
The back focus adjustment is located at the front of the camera and is accessible from either side of
the case.
To adjust the back focus:
1. Loosen the two back focus locking
screws (one on each side).
2. Turn the back focus ring until the object
is in focus.
3. When the back focus adjustment is
satisfactory, tighten the locking screws.
Do not over tighten the locking screw or
force the back focus adjustment ring.
Figure 5.
Back Focus Adjustment
BACK FOCUS
ADJUSTMENT
LOCKING SCRE
C
O
U
N
T
E
R
C
LO
C
K
W
IS
E
C
L
OC
K
WIS
E
BACK FOCUS
DJUSTMENT
RING