


SOUND PICTURE
ACITVE
CONTROL
ZOOM
1 2
6
5
6
Picture Sound Features Channels
TV
Settings
Demo
Install
Picture Sound Features Channels
TV
Settings
Demo
Install
1
2
3
Picture Sound Features Channels
TV
Contrast
Brightness
Color
Sharpness
40
4
Picture Sound Features Channels
TV
Settings
Demo
Install
Pipes
Balls
Puck
Feature Titles
or Controls
7
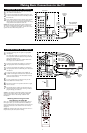
Using the On-screen Menu
SOUND PICTURE
ACITVE
CONTROL
ZOOM
1 2
2
4
3
5
1
4
Auto demo
Dual screen
Freeze-Replay-Photo finish
Install
Main Menu
Picture
- - -
Demo
Picture Sound Features Channels
TV
Settings
Demo
Install
Auto demo
Dual screen
Freeze-Replay-Photo finish
Install
Main Menu
Picture
- - -
TV
Settings
Demo
Install
Freeze-Replay-Photo finish
Install
Main Menu
Picture
Active Control
Dealer demo
Demo
Digital options
Lightsensor
3D Y/C Comb filter
Dealer demo
Using the Demo Mode
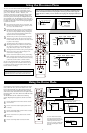
Pressing the Menu button once will display the on-screen menu.
Pressing the Menu button any time the on-screen menu is dis-
played will remove the on-screen menu from the TV screen.
HELPFUL
H
INT
Several features of this television can be placed in a demo
mode, which will show you how the feature works. Auto
Demo will automatically show all the feature demos one
after another except for the Dealer Demo mode. Specific
demo modes can be selected from the list of options within
the Demo control (Auto demo, Dual screen, PIP, and Install,
for example).
The Dealer Demo also has a sublist of the following
options: Digital options, Lightsensor, and 3D Y/C Comb
filter.
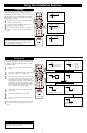
1
Press the Menu button on the remote control to show the
on-screen menu.
2
Press the Cursor Down button repeatedly until “Demo”
is selected.
3
Press the Cursor Right button to shift the menu to display
the list of Demo mode options.
4
Press the Cursor Down or Up button to select a Demo
mode option.
5
Press the Cursor Right button to activate the Demo.
Press the Cursor Down button to see
more Demo Mode options.
To see the Dealer Demo sublist,
press the Cursor Down button to
select Dealer Demo, then press the
Cursor right. Press the Cursor
Down or Up to select a mode, then
press the Cursor Right to activate
the mode.
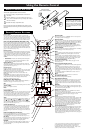
The TV’s on-screen menu controls are viewed within a
mobile map or pipe system. This system allows you to
move along linked paths tied to specific Feature Title cate-
gories (“TV,” “Picture,” “Sound,” “Features,” and
“Channels”). Each press of a Cursor button on the remote
moves the cursor control to balls indicating specific con-
trols. Each specific control may have multiple features that
can be adjusted or set. The animated on-screen menu struc-
ture will expand to show all available on-screen controls. As
it expands, it will display a series of balls grouped together
to reveal more controls.
1
Pipes represent the structure of the on-screen menu. They
tie all the controls together and show the path you can fol-
low to access the available controls.
2
Balls indicate the titles of features or controls available on
this television. When highlighted, some of these controls
may show more Pipes and Balls, indicating subcategories
or lists of controls within the highlighted control. These
subcontrols will also have Pipes and Balls.
3
The Puck tells you which way movement may take place
within the on-screen menu. The arrows on the Direction
Indicator simulate the Cursor buttons on the remote control
(Up, Down, Left, or Right).
4
The Slider controls will be displayed on some features,
allowing adjustments to the values of the controls. Some
may show a box containing a list of multiple options set-
tings. Others may have only an “On” or “Off” option.
5
To navigate the on-screen menu, start by pressing the Menu
button on the remote control. This will display the on-
screen menu in its starting position.
6
Press the Cursor Down button to select any of the Setting,
Demo, or Install controls. Starting from the TV item, press
the Cursor Right button on the remote control to select any
of the Picture, Sound, Features, or Channel controls.
See the “Using the Demo Mode” and “Using the Installation
Features” on this page and the next. Refer to the Directions for
Use manual for all other control descriptions (Picture, Sound,
Features, Channels, or Settings).
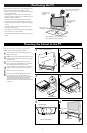
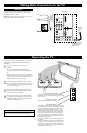
The first time you turn on the TV after purchasing it, it will be in a special mode designed to
inform you that you can change the menu language and on-screen displays to English, French, or
Spanish. Also included in this mode is Autoprogram to encourage you to have the set program
channels into the TV’s memory. For more details on the Language and Autoprogram features, see
page 8.