


User Manual BDS4622V/R and BDS4624R
1
14. APPENDIX
14.1 WALL-MOUNT INSTALLATION GUIDE
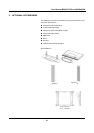
1 Empty contents of the package. Make sure the following items are
present;
● Left Wall Angle Module (A)
● Right WallAngle Module (B)
● Horizontal Support (C)
● Horizontal Support (D)
● Screws for Fix Angle x 8 (E)
● Screws for Wooden Wall Mounting x 8 (F)
● Screws for Cement Wall Mounting x 8 (G)
● Screws and Pegs for monitor x 4 (H)
● Rubber Covers x 2 (I)
● Screw x 4 (J)
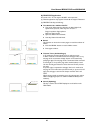
2 Attach Horizontal Supports (C and D) to the Left and Right Wall
Angle Module (A and B) using eight screws (E).
3 Install the Wall Mount Bracket onto the wall.
Notes:
The screws in this package are for mounting on a wooden or a brick
wall. Different kind of wall needs different type of screws.
Please consult with a qualified installer to make sure your wall is capable
of supporting this bracket and the monitor.
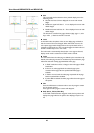
4 Adjust the mounting direction and inclination angle (0, 5, 10, 15
degrees) by adjusting the screws position on the Wall Mounting
AngleModule.
5 Insert the two Rubber Covers to the holes at the bottom of the
monitor after removing the table-top stand from the monitor.
Note:
Actual rear cabinet may vary from the drawing.
6 Remove the table-top stand from the monitor. Screw in the four
pegs at the rear of the monitor.
7 Install the monitor onto the Wall Mount Bracket by placing the four
pegs, located on the rear of the monitor, inside the mounting holes
of the Wall Angle Modules. Make the four pegs firmly seated in the
holes.
8 Put the monitor on the Wall Mount, by matching the 4 pegs to the
holes on Wall Mount.
Use accessary J and the screws to secure the monitor to the Wall
Mount by tightening the screws through the holes from both sides of
the Wall Mount.