


Telephone Lines and Additional Devices · Configuring Telephone Lines and Services 33
EN
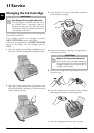
10 Telephone Lines and Additional Devices
Configuring Telephone Lines
and Services
DSL Connection
DSL Connection
In the event that you use a DSL modem: Connect the
device to the slot intended for analogue telephones/fax
machines! For additional information, please consult the
operating manual of your DSL system. Ask your telephone
or internet service provider if necessary.
ISDN Connection
ISDN Connecti on
Your device is an analogue fax device (Group 3). It is not
an ISDN device (Group 4), and therefore it cannot be
operated directly on an ISDN connection. In order to do
this, you need either an analogue adapter or a connection
for analogue terminals. Details for ISDN connections can
be found in the instructions provided with the terminal
adapter or the dial-up router.
Selecting the Dialling Process
In some countries you can set the dialling process to pulse
dialling (IWV) or tone dialling (MFV, DTMF tones).
Tone Dialling Disabled
1 Press MENU. RECEPT. SET-UP appears on the
display.
2 Select using [
INSTALLATION.
3 Confirm with o.
STATION NAME appears on the
display.
4 Select using [
TEL.LINE SETUP.
5 Confirm with o.
LINE TYPE appears on the display.
6 Select using [
DIAL MODE.
7 Confirm with o.
8 Use [ to select the desired dialling process.
9 Confirm with o.
Voice-Mailbox
Type Basic
(IPF¦520)
You cannot simultaneously use the answering machine
facility of your telephone service provider (= voice-mail
box) and receive faxes on your devices. Get the mailbox
function for your telephone connection deactivated. When
the fax switch accepts the call, the mail-box of the service
provider does not step in. Enquire with your telephone
service provider.
Voice-Mailbox
Type 3 (mit Telefon)
(IPF¦525, IPF¦555)
You cannot simultaneously use the answering machine
facility of your telephone service provider (= voice-mail
box) and receive faxes on your devices. Get the mail-box
function for your telephone connection disabled or set the
number of rings for the fax switch to less than 5. When the
fax switch accepts the call, the mail-box of the service pro-
vider does not step in. Contact your telephone service pro-
vider (also see Chapters "Settings/Setting the Fax Switch").
PABX Systems
Private branch exchanges (PABX) are typical in many
offices and some households. You must dial an outside line
access code in order to get a connection to the public tele-
phone network (PSTN) from a PABX.
Additional Telephone No Extension
1 Press MENU. RECEPT. SET-UP appears on the
display.
2 Select using [
INSTALLATION.
3 Confirm with o.
STATION NAME appears on the
display.
4 Select using [
TEL.LINE SETUP.
5 Confirm with o.
LINE TYPE appears on the display.
6 Confirm with o. The display shows e.g.:
PUB-
LIC(PSTN)
.
7 Select using [
PRIVATE(PBX).
8 Confirm with o.
9 Confirm with o.
10You can exit with j.
The device is now setup for the PABX operation. You must
enter the outside line access code for the connection to the
public telephone network. This is mostly 0.
Notice
Tone Dialling Disabled
Use pulse dialling (IWV), only if the tone dial-
ling process (MFV) is disabled for your link.
Notice
Additional Telephone No Extension
An additional telephone connected to the device
on a telephone socket is not considered an exten-
sion.
Notice
Incorrect Outside Line Access Code
For older telephone systems, the outside line
access code can be R (= FLASH). Read how to
switch this function on in the next section. If the
connection to the public telephone network is
not possible, contact your telephone system sup-
plier.