


1
<ARE1350> En
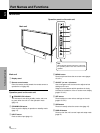
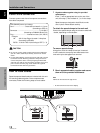
Part Names and Functions
English
¶ Incorporation of high performance XGA wide
plasma panel.
The XGA wide panel incorporates pioneering developments that
have allowed realization of more than 2.5 times the data capacity
of the VGA panel used at the TV broadcasting level until now*.
With a definition of 1280 pixels horizontal and 768 pixels vertical,
the XGA wide panel provides unsurpassed reproduction of a
wide range of images from personal computers.
* When the screen aspect is 4:3
VGA: 640 pixels x 480 pixels
XGA: 1024 pixels x 768 pixels
¶ Achievement of XGA class high level luminance
Even in the case of luminance, which is difficult to keep
consistent with the level of definition, using originally developed
PIONEER technology for optimization, top level luminance has
been achieved at this definition.
¶ Realization of thin 9.8 cm unit depth while retaining
a maximum class level 50 inch screen
As well as producing a 50 inch wide screen, which has been
difficult to do with a direct view CRT, the extremely thin 9.8 cm
unit depth size opens up completely new possibilities to how
viewing rooms may be designed.
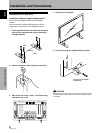
¶ Unlimited placement possibilities
Designed to be attached to a wall, set on a table top stand or
placed on a floor rack, this unit can be installed many ways.
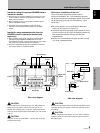
¶ Optional line (sold separately)
(For details, please consult the dealer where this unit was
purchased.)
1 Table top stand : Stand designed specifically for
PDP-502MXE table top placement.
2 Wall installation unit : Wall installation bracket designed as a
wall interface for securing the unit to
various types of wall construction
formats.
CAUTION:
This product may be used only with Model PDK-5001 stands.
Use with other stands may result in instability causing possible injury.
3 Speaker system designed specifically for plasma displays
(width: 7.4 cm)
: With the adoption of a vertical twin system designed with a
2.5 cm domed conical tweeter in the center and newly
developed 4.5 cm wide oval shaped units arranged vertically,
sound field orientation has been greatly improved. Although
the cabinet depth is only 7.4 cm, a rich, dynamic sound is
produced. (When speakers are attached, the
operation panel
on this unit is not operable.)
¶ Designed to conserve energy
This product has been designed to minimize power consumption
when the power is in standby. The value of the power consumption in
standby mode is 0.6 W.
Features Contents
Before Proceeding
Safety Precautions ............................. i
Before Proceeding ............................. 2
How to Use This Manual .................................... 2
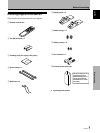
Checking supplied accessories .......................... 3
Part Names and Functions ............... 4
Main unit.............................................................. 4
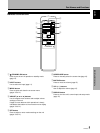
Remote control unit ............................................ 5
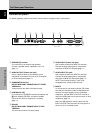
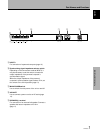
Connection panel ................................................ 6
Installation and Connections ........... 8
Installation of the unit......................................... 8
Connection to a personal computer ................ 10
Audio connections ............................................ 11
Control cord connection ................................... 11
Power cord connection..................................... 12
How to route cables.......................................... 12
Setting Up the System ................... 13
Setup after connection ..................................... 13
Operations ....................................... 14
Selecting an input source................................. 14
Screen size selection ........................................ 16
POWER SAVE .................................................... 17
Display Panel Adjustments ............ 18
Adjusting the picture quality............................ 18
Adjusting the display image ............................ 19
Making the PC image brighter (ABL)............... 20
Making the PC image clearer (H/V ENHANCE) .......
21
Resetting the unit to factory set defaults ........ 21
Additional Information ................... 22
Cleaning ............................................................. 22
Inserting the batteries in the remote
control unit ..................................................... 22
Operating range of the remote control unit ... 23
Troubleshooting ................................................ 23
Specifications .................................................... 25
Supplement 1 .................................................... 26
Supplement 2 .................................................... 27
Explanation of Terms ........................................ 27