scan images of both front and rear sides in one image. After the function of
Merge Pages is enabled, you can make the selection of Horizontally to
generate both front and rear image data horizontally in a joined image (the rear
image will be placed at the right side next to the front image), or make the
selection of Vertically to generate both front and rear image data vertically in a
joined image (the rear image will be placed below the front image).
5. Load one business card and click the Scan button.
6. The scanned images are displayed in the BizCard Finder main window, and
you may proceed OCR to convert images into editable text formats.
S
S
c
c
a
a
n
n
n
n
i
i
n
n
g
g
f
f
r
r
o
o
m
m
P
P
l
l
u
u
s
s
t
t
e
e
k
k
D
D
I
I
C
C
a
a
p
p
t
t
u
u
r
r
e
e
P
P
r
r
o
o
g
g
r
r
a
a
m
m
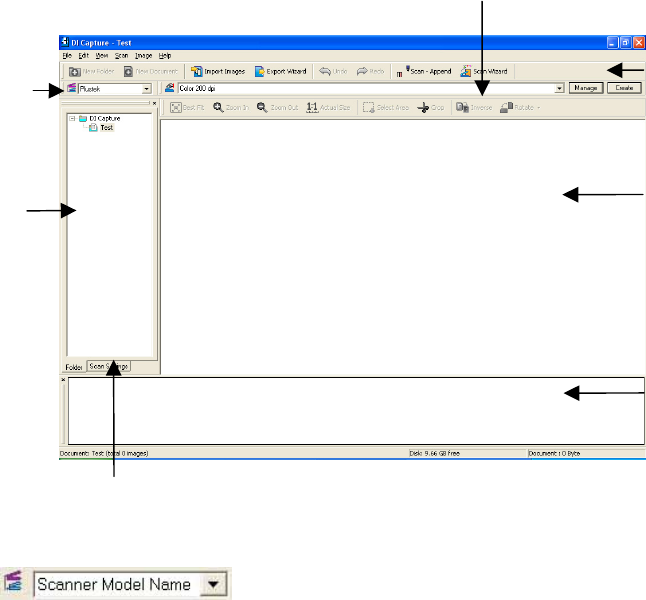
1. Click the Windows Start button to launch DI Capture.
Folde
Pane
Select the
scanne
Scan Profile
Viewer
Pane
Browser
Pane
Toolbar
Scan Settings Pane
2. Within DI Capture, select this scanner from the drop-down list of
.
3. Select a document from the Folder Pane to store the scanned images.
(To create a new folder and/or a new document, click the New Folder and/or
New Document button from the toolbar.)
4. Select an appropriate scan profile. (You may click the tab of Scan Settings
Pane to check if the current settings of the selected scan profile meet your
needs. If not, you may click the Create or Manage button beside the Scan
Profile to create a new profile or modify an existing profile.)
5. Click the Scan – Append button from the toolbar.
6. When the scan finishes, all scanned images are displayed on the Browser
Pane. The last scanned image appears on the Viewer Pane.
18
