


CPD10WALLARM
Page 10
Visit Premier Mounts website at http://www.mounts.com Installation Instructions
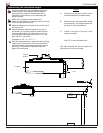
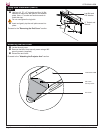
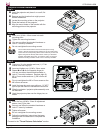
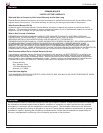
Step 2
Projector Bracket Installation
Invert the projector and place it on a soft, fl at
surface.
Remove any foot levelers that might prevent
bracket installation.
Locate the mounting points on the projector.
Place the bracket on the projector.
Align the mount holes on the bracket with the
mounting points on the projector.
Insert one (1) M4 x 10mm screw into each
mounting point.
Tighten the mounting hardware.
You can use either the standard hardware or
Lock-It™ security hardware.
Do not overtighten the mounting screws.
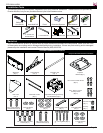
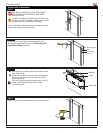
Step 1
Your Premier Mounts bracket comes with the option of using
Lock-It™ Security Screws. Simply replace any of the combo head
screws with the corresponding sized Lock-It™ Security screws and
tighten using the M3 Security Allen wrench. When you see these
graphics associated with a step, you have the option of using the
standard mounting hardware or the Lock-It™ Security hardware.
Projector shown is for example purposes only.
Images not to scale.
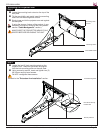
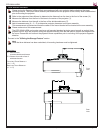
Step 4
Step 3
Insert the four (4) M6 x 12mm tilt adjustment
screws, two (2) per side.
You can use either the standard hardware or
Lock-It™ security hardware.
Tighten all screws.
Do not overtighten the mounting screws.
Follow the installation instructions that were
packaged with the base box to complete the
installation.
Proceed to the "Throw Distance Calculation" section.
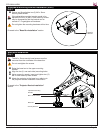
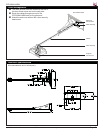
Place one (1) nylon washer and one (1) ¼″ fl at
washer over the hinge pin.
Insert and tighten one (1) M6 x 12mm screw.
Repeat and for the opposite hinge pin.
You can use either the standard hardware or
Lock-It™ security hardware. Replace eight (8)
M6 x 12mm screws and one (1) M6 x 8mm set
screw.
Do not overtighten the M6 x 12mm screws or the
M6 x 8mm set screw.
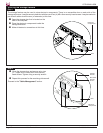
Install the base box onto your ceiling or 1½” NPT
pipe as per the base box installation instructions.
Slide the projector / projector plate assembly onto
the base box.
Hook the projector plate over the hinge pins, as
shown.