


47
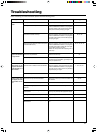
Tr oubleshooting
Before consulting your authorized dealer, please check the following points.
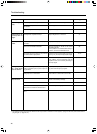
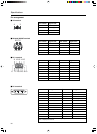
Symptom Probable cause Corrective action Page
Power is not sup-
plied.
Light is not emitted,
or light is dim.
With power on, the
projector works but
stops abruptly in a
few minutes.
Video image does
not appear, or audio
sound does not oc-
cur.
Is the power cord disconnected?
Is the light-source lamp cover closed correctly?
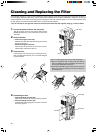
Is the filter inserted correctly?
Has the lamp life expired? (Has the lamp time
reached 2000 hours?)
Is the lens cap removed?
Is the lamp near exhaustion?
Is the air inlet or exhaust vent area blocked?
Is the filter dirty?
Is the correct input terminal selected?
Are devices connected correctly?
Are signals being supplied from the connected
devices?
Are input signals (scanning frequency, etc.)
appropriate?
Is “Brightness” adjusted correctly?
Is volume set at minimum?
Are video and audio turned off by pressing the
HIDE button?
Insert the power cord (plug) firmly.
After the projector goes into the stand-by state
with the STAND BY indicator on, unplug from
the main power outlet, close the light-source
lamp cover correctly and plug on again.
After the projector goes into the stand-by state
with the STAND BY indicator on, unplug from
the main power outlet, insert the filter properly
and plug on again.
After the projector goes into the stand-by state
with the STAND BY indicator on, unplug from
the main power outlet, replace with a new light-
source lamp and plug on again.
Reset the “Lamp time” after replacing with a
new lamp.
Remove the lens cap.
Check the “Lamp time” on the menu, and if
the lamp is near exhaustion, get ready a new
lamp or replace it then.
After the projector goes into the stand-by state
with the STAND BY indicator on, unplug from
the main power outlet, remove any blocking
object and plug on again.
Clean filter.
Select the correct input with the VIDEO and
PC buttons.
Connect devices correctly.
Set connected devices correctly.
Check if the signal is appropriate (scanning fre-
quency, etc.) and input the appropriate signal.
Adjust “Brightness” on the menu.
Adjust volume with the VOLUME +/- buttons.
Press the HIDE button to turn video and audio
on.
24
25, 27, 44
25, 27, 46
25, 27, 43, 44, 45
24
43, 44, 45
7, 8, 15, 25, 27
46
25, 26
21, 22
—————
19, 20
35
27
29