


Getting started_29
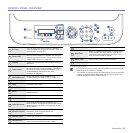
USING A WIRELESS NETWORK(CLX-3175FW ONLY)
You must configure the appropriate network parameters to use your printer
in a wireless network. To do this, you can use both control panel and
SyncThru Web Service, an embedded web site of your printer. This
section gives you basic information on 802.11b/g network parameters which
can be configured from the control panel.
You can retrieve basic settings by selecting a wireless network or manually
configure them as you need.
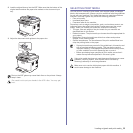
1. Press Menu on the control panel until you see Network on the bottom
line of the display and press OK.
2. Press the left/right arrow until Wireless appears and press OK.
3. Press the left/right arrow until WLAN Setting appears and press OK.
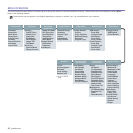
4. Press the left/right arrow to select the setup method you want appears
and press OK.
•Wizard:The wireless network interface card in your printer
searches for wireless networks in the area and shows the results.
•Custom:You can configure the wireless settings according to your
needs.
Wizard mode
1. The wireless network interface card on your machine searches for
wireless network in the area and shows the results.
2. Press the left/right arrow to select a network you want to use in Search
List and press OK.
3. When WLAN Security
None
appears on the display,
press OK to save
your selection
. go to step 6.
If you see another messages, go on to the next step.
4. According to the network you select, WLAN security encryption type will
be WEP or WPA.
• In case of WEP, Press the left/right arrow to selcet Open System or
SharedKey.
- Open System: Authentication is not used, and
Encryption
may or
may not be used, depending on the need for data security. Enter
the WEP Key using alphanumeric after selecting Open System.
- SharedKey: Authentication is used. A device that has a proper
WEP Key can access the network. Enter the WEP Key using
alphanumeric after selecting SharedKey.
• In case of WPA, Enter the WPA Key using alphanumerics. The Key
length should be between 8 to 63 characters long.
5. Press OK.
6. Press Stop/Clear to return to ready mode.
Custom mode
1. Press OK when Edit SSID appears on the bottom line of the display.
2. Enter the SSID when Edit SSID appears on the top line of the display,
the name that identifies a wireless network. SSID is case-sensitive so
you need to enter it carefully. Press OK.
3. Select the type of wireless connections. Press the left/right arrow to
select the method of
Operation Mode
you want and press OK.
•
Ad-hoc
: Allows wireless devices to communicate directly with each
other in a peer-to-peer environment. Go to step 4.
•
Infrastructure
: Allows wireless devices to communicate with each
other through an access point. Go to step 5.
4. Press the left/right arrow to select the method of
Channel
you want and
press OK. If you select
Auto
, the wireless network interface card on your
machine will automatically adjust the channels.
5. Press the left/right arrow to select the method of WLAN Security you
want and press OK.
•
None
: This is used when the validation of a wireless device’s identity
and data encryption are not required for your network. Open system
is used for IEEE 802.11 authentication.
•
Static WEP
: This uses the WEP (Wired Equivalent Privacy)
algorithm suggested by IEEE 802.11 standard for security. Static
WEP security mode requires a proper WEP key for data encryption,
decryption, and IEEE 802.11 authentication. Press the left/right
arrow to select the setup method you want in Authentication and
press OK.
- Open System: Authentication is not used, and encryption may or
may not be used, depending on the need for data security. Enter the
WEP Key using alphanumeric after select Open System and then
press OK.
- SharedKey: Authentication is used. A device that has a proper
WEP key can access the network. Enter the WEP Key using
alphanumeric after selecting SharedKey and then press OK.
•
WPA-PSK
or
WPA2-PSK
: You can select WPA-PSK or WPA2-PSK
to authenticate the print server based on WPA Pre-Shared Key. This
uses a shared secret key (generally called Pre Shared Key
passphrase) that is manually configured on the access point and
each of its clients. This is suitable for users who want to use WPA
but do not have a RADIUS server installed on their network.
a. Press OK when
WPA-PSK
or
WPA2-PSK
appears on the bottom
line of the display.
b. Press the left/right arrow to select
TKIP
or
AES
in
Encryption
and
press OK. If you select
WPA2-PSK
,
press the left/right arrow to
select
AES
or
TKIP
+
AES
in
Encryption
and press OK.
c. Enter the WPA Key using alphanumeric and press OK.
6. When you have finished, press Stop/Clear to return to the ready mode.
If you do not know about your wireless environment, please ask the
network administrator.
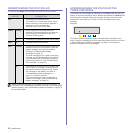
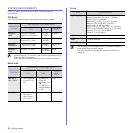
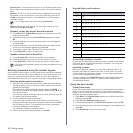
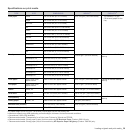
Key HEXADECIMAL FORMAT ASCII FORMAT
64-bit WEP 10 digits (0 ~9, A~F) 5 Alphanumeric
characters
128-bit WEP 26 digits (0 ~9, A~F) 13 Alphanumeric
characters
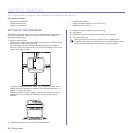
In Ad-Hoc mode, even if the network cable is connected, your
printer will use the wireless interface.
WPA-PSK
or
WPA2-PSK
are not displayed
In Ad-Hoc mode.
If you select
Infrastructure
in
Operation Mode
, you must
disconnect the network cable to activate wireless network after
completing the network setting.