


45
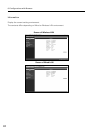
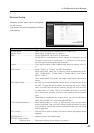
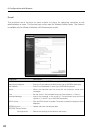
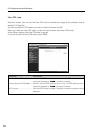
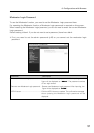
6. Configurations with Browser
* Not displayed at Wired LAN setting.
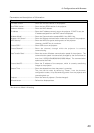
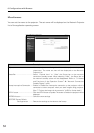
Parameter Description
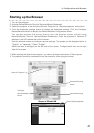
Projector ........................................Name each projector to distinguish it from other projectors (up to 32
one-byte characters). The name set here will be displayed on the
Network Projector List in the application operation screen.
IP Configured Method ................A desired IP address setup method is selected from “Manual”,
“DHCP”, and “BOOTP”.
If “DHCP” or “BOOTP” is selected, the IP address is obtained
automatically as “DHCP client” or “BOOTP client”. At this time, it is
necessary that the DHCP server/BOOTP server must be in the
environment allowing the network communication.
IP Address, Subnet Mask, and Gateway Address fields will be displayed
“-.-.-.-”, when the IP Address Configuration Method is set to DHCP or
BOOTP and failed to get the figures from the DHCP server, the
computer cannot be connected to the projector.
If the projector fails to obtain IP address from BOOTP server, the
existing IP address will be assigned.
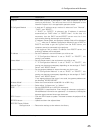
IP Address ......................................Set the IP address in the environment you wish to use.
If “IP Configuration Method” is set to “DHCP” or “BOOTP”, this
setting is not needed.
Subnet Mask ..................................Set the Subnet mask in the environment you wish to use.
If “IP Configuration Method” is set to “DHCP” or “BOOTP”, this
setting may become unnecessary depending on the settings of “DHCP
Server” and “BOOTP Server”.
Gateway Address............................Set the gateway address in the environment you wish to use.
If “IP Configuration Method” is set at “DHCP” or “BOOTP”, this
setting may become unnecessary depending on the settings of “DHCP
Server” and “BOOTP Server”.
If any segment beyond the router is not used, the gateway address can
be remained
"255.255.255.255".
Wireless Mode*..............................Select the Communication mode 802.11b or 802.11b.g.
Network Type*................................Select either “Infrastructure” or “AdHoc”.
SSID* ..............................................Set the SSID/ESSID (up to ASCII 32 characters).
SSID/ESSID is case-sensitive. Even though all characters projected in
Wired/Wireless information are uppercase, it is necessary to distinguish
between upper case and lower case characters.
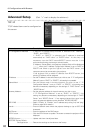
APPLY button..................................Click the APPLY button to update. The screen to restart the projector will be
displayed.
REFRESH button ............................Update and show the adjusted data.
RESTORE Factory Default
Settings button ..........Restore the settings to the values at the factory.