


3-44
PRINTER
Contents
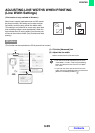
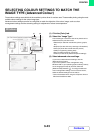
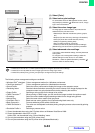
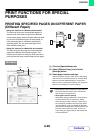
(1) Select [Color].
(2) Select colour print settings.
To use the Mac OS Color Management function, select
the [ColorSync] checkbox . When this is done, "Image
Type" cannot be selected.
(3) Select the colour image type.
An image type to match the data to be printed can be
selected from the pull-down menu.
• Standard (for data that includes text, photos, graphs,
etc.)
• Graphics (for data with many drawings or illustrations)
• Photo (for photo data or data that uses photos)
• CAD (for engineering drawing data)
• Scan (for data scanned by a scanner)
• Custom (for data to be printed with special settings)
[Neutral Gray] can be used when [Custom] is selected.
(4) Select advanced colour settings.
If you wish to select detailed settings, click the [Advanced
Color] button.
To configure colour management settings, select the
desired settings from the menus. To use "CMYK
Simulation", select the [CMYK Simulation] checkbox
and then select the desired setting.
The following colour management settings are available.
• Windows ICM*
1
checkbox: Colour management method in a Windows environment
• ColorSync checkbox*
2
: Colour management method in a Macintosh environment
• Source Profile: Select the colour profile used to display the image on the computer screen.
• Rendering Intent: Standard value used when converting the colour balance of the image displayed on the
computer screen to a colour balance that can be printed by the machine.
• Output Profile: Selecting a colour profile for the image to be printed
• CMYK Correction*
3
: When printing a CMYK image, you can correct the image to obtain the optimum result.
• Screening: Select the most suitable image processing method for the image being printed.
• Neutral Gray: Select the toner colour used to print grey areas.
• Pure Black Print*
4
: Black text and vector graphics can be printed using black toner only.
• Black Overprint*
4
: Prevents whitening of the outline of black text.
• CMYK Simulation*
4
: The colour can be adjusted to simulate printing using the process colours used by printing
presses.
• Simulation Profile*
4
: Selecting a process colour
*1 Cannot be selected when using the PS printer driver on Windows Vista/Server 2008.
*2 Cannot be selected in Mac OS X v10.2.8.
In Mac OS 9, can be selected in the "Colour Matching" menu.
*3 Can only be used when using the PCL6 printer driver.
*4 Can only be used when using the PS printer driver (Windows/Macintosh).
Macintosh
(3)
(2)
(1)
(4)
• In Mac OS X v10.5 to 10.5.1, click the [Advanced] tab to configure advanced colour settings.
• In Mac OS X v10.2.8, select the colour image type from the "Image Type" menu.
• In Mac OS 9, select [Color], [Color2], and [Color3] to configure colour print settings.