


112
4
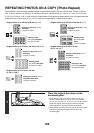
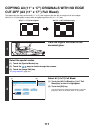
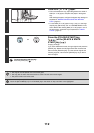
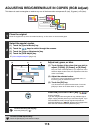
Load A3W (12" x 18") paper.
• Pull out the extension tray, adjust the guides to the width of
A3W (12" x 18") paper, and place the paper in the bypass
tray.
After loading the paper, configure the bypass tray settings as
explained in "MAKING COPIES USING THE BYPASS
TRAY" (page 41).
• To load A3W (12" x 18") paper in tray 3, tray 4, or the large
capacity tray (MX-LCX3), see "2. LOADING PAPER" in the
User's Guide. After loading A3W (12" x 18") paper in one of
the above trays, select the tray as explained in "PAPER
TRAYS" (page 14).
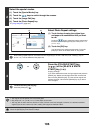
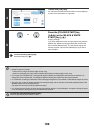
5
Press the [COLOUR START] key
( ) or the [BLACK & WHITE
START] key ( ).
Copying will begin.
If you have selected sort mode, change originals and press the
[START] key. Repeat until all pages have been scanned and
then touch the [Read-End] key. (For the second original and
following originals, use the same [START] key as you did for
the first original.
To cancel scanning and copying...
Press the [STOP] key ( ).
• The original must be placed on the document glass.
• The copy ratio is 100% when this function is used. The ratio cannot be changed.
• The punch function cannot be used.
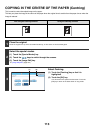
To cancel A3 (11x17) Full Bleed...
Touch the [A3 Full Bleed] or [11x17 Full Bleed] key in the screen of step 3 so that it is not highlighted.
or