


90
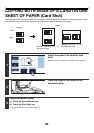
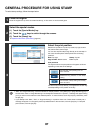
ADDING THE DATE TO COPIES (Date)
The date can be printed on copies. The position of the date, colour, format, and page (first page only or all pages) can
be selected.
Example: Printing APRIL 1, 2006 in the top right corner of the paper.
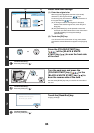
1
Touch the [Date] key in the stamp selection screen.
See steps 1 to 4 of "GENERAL PROCEDURE FOR USING STAMP" (page 87).
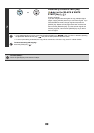
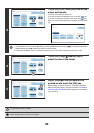
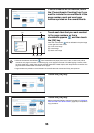
2
Set the date format.
(1) Touch the key that shows the desired date
format.
(2) If you selected [YYYY/MM/DD],
[MM/DD/YYYY], or [DD/MM/YYYY], touch the
[/], [.], [-], or [ ] key to select the separator.
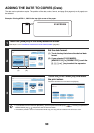
3
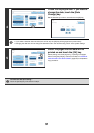
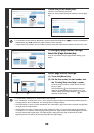
Touch the [Print Colour] key and select
the print colour.
Touch the desired colour and touch the [OK] key.
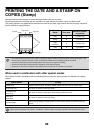
• If you selected a colour other than [Bk (Black)], press the [COLOUR START] key ( ). Pressing the [BLACK &
WHITE START] key ( ) will print the date in black and white.
• If the date is printed in colour on a black and white copy, the copy will be included in the full colour count.
01/APR/2006
Cancel
Print Colour
Bk(Black)
OK
Date Change MM DD, YYYY
DD/MM/YYYY
MM/DD/YYYY
YYYY/MM/DD
01/APR/2006
All Pages
First Page
Stamp
Date
(1) (2)
Cancel
Print Colour
Bk(Black)
OK
Date Change MM DD, YYYY
DD/MM/YYYY
MM/DD/YYYY
YYYY/MM/DD
01/APR/2006
All Pages
First Page
Stamp
Date
OK
B(Blue)G(Green)R(Red)
Bk(Black)
Y(Yellow)M(Magenta)C(Cyan)
Stamp
Print Colour