


Setup & Connections
E-24
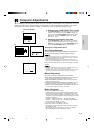
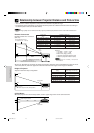
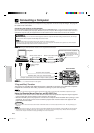
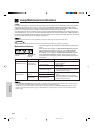
Reversed Image and Ceiling-mount Setups
Using the Reverse/Invert Image Function makes the following setups possible. See page 22 for use of this func-
tion.
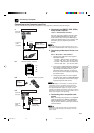
Example of a reversed image setup
• By placing a mirror (normal flat type) in front of the lens and using the horizontal image reverse function, the image re-
flected from the mirror can be projected onto the screen.
• Rear projection with a rear projection screen is also possible when using the horizontal image reverse function.
Side View
90˚
Side View
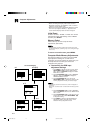
The projector lens should be cen-
tered in the middle of the screen.
If the lens center is not perpendicular
to the screen, the image will be dis-
torted, making viewing difficult.
Mirror
Audience Side
ŀ Ł
90˚
Rear Projection
CAUTION
• When using a mirror, be sure to carefully position both the projector and the mirror so the light does not shine into the eyes
of the audience.
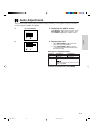
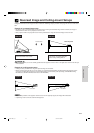
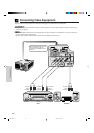
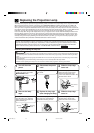
Example of a ceiling-mount setup
• Ceiling-mount is possible when using the optional ceiling-mount bracket.
• Before mounting the projector, be sure to contact your nearest Authorized Sharp Industrial LCD Products Dealer or Ser-
vice Center to obtain the manufacturer recommended ceiling mount bracket (sold separately). (AN-XGCM50 Ceiling
Mount Bracket, AN-EP101AP Extension Tube for AN-XGCM50.)
Top View Side View
90˚
90˚
Lens center
Lens center
• If the relative positions of the projector and the screen are not properly aligned, the image will be distorted.
• A polarizing screen cannot be used with this projector.
XG-NV4SU (E)-d 98.10.19, 5:39 PM24