


E-13
Setup & Connections
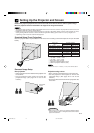
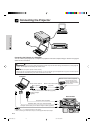
Setting Up the Projector and Screen
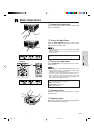
Ceiling-mount Setup
• Use the optional Sharp ceiling-mount bracket for this installation.
• Before mounting the projector, contact your nearest Authorized Sharp Industrial LCD Products dealer or Service
Center to obtain the recommended ceiling-mount bracket (sold separately). (AN-XGCM50 ceiling-mount bracket,
AN-EP101AP extension tube for AN-XGCM50.)
• When the projector is in the inverted position, use the upper edge of the screen as the base line.
• Use the projector’s menu system to select the appropriate projection mode. (See page 34 for use of this function.)
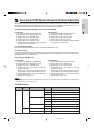
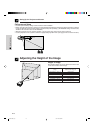
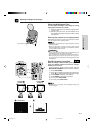
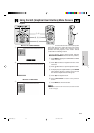
Adjusting the Height of the Image
300Љ (240Љ W ן 180Љ H)
200Љ (160Љ W ן 120Љ H)
150Љ (120Љ W ן 90Љ H)
100Љ (80Љ W ן 60Љ H)
80Љ (64Љ W ן 48Љ H)
60Љ (48Љ W ן 36Љ H)
40Љ (32Љ W ן 24Љ H)
18Љ (45.8 cm)
12Љ (30.5 cm)
9Љ (22.9 cm)
6Љ (15.3 cm)
4
51
⁄64Љ (12.2 cm)
3
19
⁄32Љ (9.2 cm)
2
25
⁄64Љ (6.1 cm)
Distance from the lens center to the
bottom of the image (H)
Picture size
(diag.)
90˚
H
Height of Image
See the table below for exact distances from the lens
center to the bottom of the image.
90˚
XG-NV5XU (E)-b 98.11.20, 9:36 PM13