


E-28
Operation
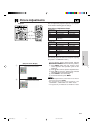
Saving and Selecting Adjustment Settings
This projector allows you to store up to seven adjustment
settings for use with various computers. Once these
settings are stored, they can be easily selected each
time you connect the computer to the projector.
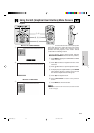
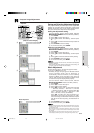
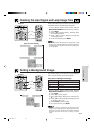
Saving the adjustment setting
(For use with the “Power” remote control, slide the
MOUSE/ADJUSTMENT switch to the ADJ. position.)
1 Press MENU.
2 Press ß/© to select “Fine Sync”.
3 Press ∂/ƒ to select “Save Setting”, and then press
©.
4 Press ∂/ƒ to select the desired memory location of
the setting.
5 Press ENTER to save the setting.
6 To exit from the GUI, press ENTER.
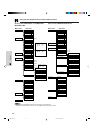
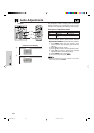
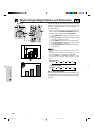
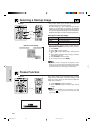
Selecting a saved setting
(For use with the “Power” remote control, slide the
MOUSE/ADJUSTMENT switch to the ADJ. position.)
1 Press MENU.
2 Press ß/© to select “Fine Sync”.
3 Press ∂/ƒ to select “Select Setting”, and then press
©.
4 Press ∂/ƒ to select the desired memory setting.
5 Press ENTER to select the setting.
6 To exit from the GUI, press MENU.
• If the memory position has not been set, the resolution and frequency
will not be displayed.
• When selecting the stored adjustment setting with “Select Setting”, the
computer system should match the stored setting.
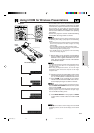
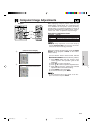
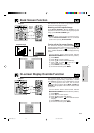
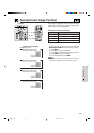
Mode Adjustment
Used to display image in the text and graphic modes.
C
ONNECTING TO IBM-PC COMPUTERS
• Ordinarily, the type of input signal is detected and the
correct resolution mode (Text or Graphics) is
automatically selected. However, for the following
signals, set “Mode” on the “Fine Sync” menu screen to
“ON” or “OFF” to select the projector’s resolution mode
to match the computer display mode properly.
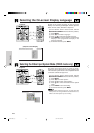
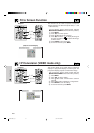
(For use with the “Power” remote control, slide the
MOUSE/ADJUSTMENT switch to the ADJ. position.)
1 Press MENU.
2 Press ß/© to select “Fine Sync”.
3 Press ∂/ƒ to select “Mode”.
4 Press ß/© to select “ON” for text mode (720 dots
ן 350 lines, 720 dots ן 400 lines or 1,152 dots
ן 864 lines, 60 Hz) or “OFF” for graphic mode (640
dots ן 350 lines, 640 dots ן 400 lines or 1,024
dots ן 864 lines, 60 Hz). (For IBM-PC)
Press ß/© to select “ON” when connecting to a
Macintosh II with 35 kHz dot frequency or “OFF”
when connecting to a Macintosh LC Series computer
with 34.79 kHz dot frequency. (For Macnitosh LC
Series)
5 Press ENTER to save the setting.
6 To exit from the GUI, press MENU.
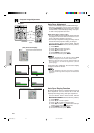
• When connecting third party video cards and other Macintosh computers,
set “Mode” on the “Fine Sync” menu screen to “ON” or “OFF” to select the
correct display mode.
• When the input signal is automatically detected or when there is no input
signal, “Mode (---)” appears on the screen and the display mode cannot
be changed.
• Avoid displaying computer patterns which repeat every other line (hori-
zontal stripes). (Flickering may occur, making the image hard to see.)
Computer Image Adjustments
(GUI) On-screen Display
Projector
2
3
4
MOUSE
ADJ.
ON
MUTE
TOOLS
R-CLICK ENTER
INPUT
IrCOM
FREEZE
AUTO SYNC
MENU
LASER
BLACK
SCREEN
VOL
OFF
5
2, 3, 4
1, 6
Mode Adjustment
XG-NV5XU (E)-c 98.11.20, 11:09 PM28