


-32
Setting the Projector Using RS-232C or Telnet
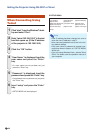
When Connecting Using
Telnet
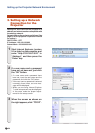
1 Click “start” from the Windows
®
desk-
top and select “Run”.
2 Enter “telnet 192.168.150.2” in the text
box that opens up. (If the IP address
of the projector is 192.168.150.2.)
3 Click the “OK” button.
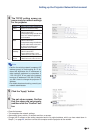
4 “User Name:” is displayed. Input the
user name and press the “Enter”
key.
• If a user name has not yet been set, just
press the “Enter” key.
5 “Password:” is displayed. Input the
password and press the “Enter” key.
• If a password has not yet been set, just press
the “Enter” key.
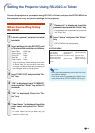
6 Input “setup” and press the “Enter”
key.
• SETUP MENU will be displayed.
Note
• If the IP address has been changed, be sure to
enter the new IP address in step 2.
• User name and password are not set in the fac-
tory default settings.
• If the user name or password is entered incor-
rectly three times in steps 4 or 5, SETUP MENU
will be quit.
• If you are using Windows Vista
®
, activate Telnet
Client. For details, see the operation manual of
your computer.
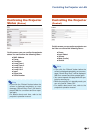
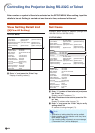
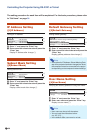
---------------------------------SETUP MENU--------------------------------
[1]IP Address [2]Subnet Mask [3]Default Gateway
[4]User Name [5]Password
[6]RS-232C Baud Rate [7]Projector Name [8]DHCP Client
[A]Advanced Setup [D]Disconnect All
[V]View All Setting [S]Save & Quit [Q]Quit Unchanged
setup>
▼SETUP MENU